18
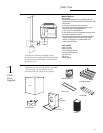
JXBC57 Kit
For Outdoor Remote Blower Locations
2
Mark
Mounting
Location
Step
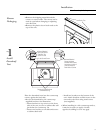
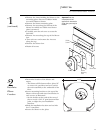
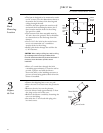
• The base is designed to be mounted to studs
on 16" centers. Use the dimensions shown to
determine the location of the ducting and
wiring through the wall.
– Or Place the base against the exterior wall
and mark the 6 mounting locations, the 6"
duct location and the hole for the wiring.
Use pencil or chalk.
• The bottom of the base assembly must be
10" min. above the ground. There should be
no obstructions to the discharge from the
damper.
• Cut a 6-1/8" dia. hole in the vertical struc-
ture to accommodate a 6" round duct
another hole for the wiring.
• Drill 6 pilot holes through the wall for the
6/16" fasteners.
CAUTION:
When cutting or drilling into a wall or ceiling,
do not damage electrical wiring or hidden utilities.
Check for interference with floor joists and stud walls. If
necessary, locate the base to provide a secure
installation.
• Place a 6" round duct through the hole
extending approximately 3" from the wall to
provide a proper seal with the blower.
Secure the duct to the building structure to
prevent it from being pushed back when the
blower is installed.
10" Min
Above Ground
6-11/16"
16"
4-3/4"
6"
12"
Align
With Duct
Opening
On Outside
Wall
1-13/16"
12-15/16"
6 Holes
For 5/16
Fastners
3
Prepare
the Vent
Step
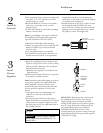
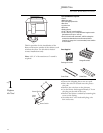
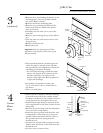
• Flatten the shipping box to use as a pad.
• Place the unit on its back onto the protective
pad.
• Remove the wire box on the plenum.
• Cut the blower leads approximately 3" from
the plug on the end of the vent.
• Remove the blower conduit by loosening the
screw on the fitting.
• Set aside the 3" wire leads with plug, wire
box and screws.
3"
Blower Wire Box
Blower Conduit
Loosen
Screw


