


– 10 –
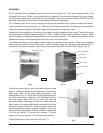
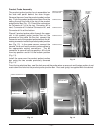
Product Probe Assembly
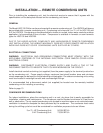
The product probe junction box is assembled on
the side wall panel behind the door hinges.
Remove the cover from the product probe junction
box. Push the product probe wires down from the
ceiling through the hole at the top of the product
probe juction box (Fig. 12). Extend the connectors
so Connector #1 is at the top, Connector #2 is
next, Connector #3 is below Connector #2, and
Connector #4 is at the bottom.
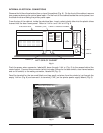
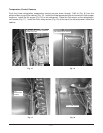
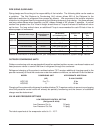
Place #1 product probe cable through the upper
slot in the product probe junction box so the
grommet on the cable fits the slot; connect the
connector end of the product probe cable to the #1
mating connector inside the product probe junction
box (Fig. 13). In the same manner connect the
second, third and fourth product probe cables to
the appropriate mating connectors: The #2
connector is second from top position, #3 is third
from top position and #4 is the bottom position
(Fig. 13).
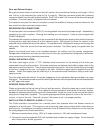
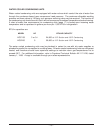
Install the cover over the product probe junction
box using the two screws previously removed
(Fig. 14).
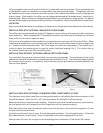
From the top electrical box, seal the hole around the probe wires so warm air and foreign matter do not
reach down the hole into the product probe junction box. Duct seal (putty) is supplied with the cabinet.
PL-41532-1
CONNECTOR # 1
CONNECTOR # 2
CONNECTOR # 3
PRODUCT PROBE
JUNCTION BOX
CONNECTOR # 4
PRODUCT
PROBE
CABLES
PL-41533-1
GROMMET IN BOTTOM SLOT
PRODUCT PROBE
CONNECTOR
MATING CONNECTOR # 4
PRODUCT
PROBE
CABLE
PL-41534-1
COVER
PRODUCT PROBE
JUNCTION BOX
Fig. 13 Fig. 14
Fig. 12