


23
166240004
12/1/94
Rev 3/4/96
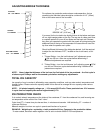
RESTORING ICE THICKNESS POTENTIOMETER TO FACTORY SETTING
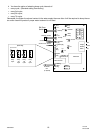
1. Turn cuber power switch to the OFF (center) position.
2. Unplug the proximity switch(es) and the thermistor(s) from the circuit board.
3. Turn the cuber power switch to the ON position. The red LED D-5 will illuminate for 2 seconds and then go
out.
4. Short across the bottom 2 pins of the Test Plug using a wire jumper or a pocket screwdriver. Immediately
remove the jumper.
One of these two conditions will exist:
S If the Ice Thickness Potentiometer is within the factory setting the D-5, red LED will flash continiously.
S If the Ice Thickness Potentiomater is not within the factory setting, the D-5 red LED will not be illuminated.
In either case the Green LED indicators will illuminate for 2 seconds each in the sequence shown below. They
will continue to sequence until you turn the power off and stop the procedure.
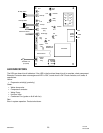
D-11 Green Hot Gas
D-12 Green Water Pump
D-14 Green Contactor
D-6 Green Fan
D-15 Green Dump Valve
Making Adjustments
When making adjustments, turn the Ice Thickness Potentiometer screw slowly to allow the circuit board time to
react. Always turn the screw one full 360_ turn, rest several seconds, then adjust another 360_ turn.
Turn the Ice Thickness Potentiometer screw 10 (ten) turns clockwise or until the red LED D-5 starts to flash –
should the LED not start to flash after 10 (ten) turns clockwise – reverse the direction and turn the screw slowly
counterclockwise until the red LED D-5 starts to flash.
When the LED starts to flash, stop turning. You have reached the original factory setting.
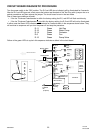
Important: Erratic component operation (water pump, condenser fan, hot gas valves, etc.) are usually a
result of a poor connection at the 8-pin connector. Before doing any diagnostic test on the control
board, be sure to check the 8-pin connector to ensure that all wires are properly installed and the
connector is securely in place.