


© 2006 Maytag Services 16026923 29
To avoid risk of electrical shock, personal injury or
death; disconnect power and gas before servicing,
unless testing requires power and/or gas.
Disassembly Procedures
Warming Drawer Hi-Limit Switch
Replacement (Select Models)
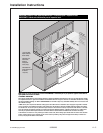
1. Remove unit from installation position, see
“Removing and Replacing Range” procedure.
2. Remove front side trim, see "Front Side Trim
Removal" procedure.
3. Remove warming drawer, see "Warming Drawer
Removal (Select Models)" procedure.
4. Remove screws securing side panel to oven chassis.
5. Remove screws securing hi-limit switch to warming
drawer support frame.
6. Label and disconnect hi-limit switch wire terminals.
7. Remove hi-limit switch from outside the warming
drawer support frame.
NOTE: Do not pull hi-limit switch and wiring through
cavity wall.
8. Reverse procedure to reinstall warming drawer hi-
limit switch.
Oven Door Removal
WARNI NG
!
To avoid risk of personal injury or property damage,
do not lift oven door by the handle.
1. Open oven door slightly and grasp door on both
sides.
2. Lift up and off the hinge receivers.
3. Reverse procedure to reinstall oven door.
Warming Drawer Track Disassembly
(Select Models)
1. Remove warming drawer, see "Warming Drawer
Removal (Select Models)" procedure.
2. Place door on a protected surface.
3. Remove screws securing front panel to glass panel.
4. Remove screws front panel to warming drawer.
5. Remove screws securing "sliding tracks" to warming
drawer.
6. Reverse procedure to reassemble warming drawer.
Warming Drawer Disassembly
1. Remove warming door, see "Warming Drawer
Removal (Select Models)" procedure.
2. Place door on a protected surface.
3. Remove screws securing front panel to glass panel.
4. Remove screws securing front panel to warming
drawer.
5. Remove screws securing "sliding tracks" to warming
drawer.
6. Reverse procedure to reassemble oven door.
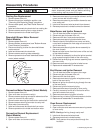
NOTE: See page 30 for illustration.
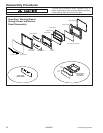
Oven Door Disassembly
1. Remove oven door, see "Oven Door Removal"
procedure.
2. Place door on a protected surface.
3. Remove screws securing door glass to oven door
trim and frame (screws located along the top and
bottom edge of oven door).
NOTE: Proceed with the following steps if replacing door
handle.
4. Remove screws securing door handle to door glass.
5. Remove screws securing upper and lower shields.
6. Remove screws securing door baffle.
7. Remove oven door insulation.
8. Remove screws securing outer and inner door glass
(and glass frame).
9. Remove oven door liner, if replacing.
10.Reverse procedure to reassemble oven door.
NOTE: See page 30 for illustration.