


29
Replacing Cooktop Light
The cooktop light consists of two 10W low-voltage halogen
capsule bulbs. See “Assistance or Service” section to reorder.
You will need a TORX
®†
T10 screwdriver to remove the bulb cover
mounting screw.
To Replace:
1. Unplug oven or disconnect power.
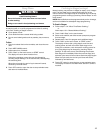
2. Remove bulb cover mounting screw, and gently open cover.
3. Remove the burned-out bulb.
4. Replace bulb, using a tissue or wearing clean cotton gloves
to handle the bulb. Do not touch bulb with bare fingers.
5. Close bulb cover and replace mounting screw.
6. Plug in oven or reconnect power.
Replacing Oven Light
The oven light is a 10W low-voltage halogen capsule bulb. It will
automatically come on when the door is opened and when the
oven is operating. See “Assistance or Service” section to reorder.
You will need a TORX
®†
T10
screwdriver to remove the bulb cover.
To Replace:
1. Unplug oven or disconnect power.
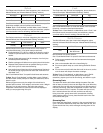
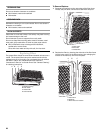
2. Gently pull vent screen rings and lift the screen off the
exhaust vent at the top of the oven.
If using recirculating exhaust venting, skip Step 3.
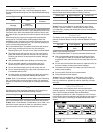
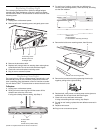
3. For wall or roof venting, remove the vent deflector by
removing the mounting screws (1 from each end), and lifting
out the vent deflector.
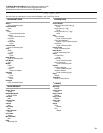
4. Remove the bulb cover mounting screw, then lift cover.
A. Bulb cover mounting screw
5. Remove the burned-out bulb by squeezing the wire clip
together, pulling to the right and lifting.
6. Replace bulb, using tissue or wearing clean cotton gloves to
handle bulb. Do not touch bulb with bare fingers.
7. Close bulb cover, and fasten with screw.
If using recirculating exhaust venting, skip Step 8.
8. For wall or roof venting, replace the vent deflector removed in
Step 3.
9. Replace vent screen.
10. Plug in oven or reconnect power.
A. Mounting screw
B. Bulb cover lens
C. Halogen bulb
A. Vent screen
B. Rings
C. Bulb cover (under screen)
A B C
†®TORX is a registered trademark of Textron Innovations Inc.
A B C
A. Bulb cover
B. Vent deflector
C. Vent deflector mounting screws (2)
A B C
A