


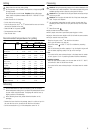


EEB 9600.0 USA 15
Enamel
Oven interior, front, baking trays, drip pan
It’s okay to use some plastic sponges with an abrasive side. However, some
products do contain grains in the abrasive side of the sponge which can cause
scratches. Carefully test the sponge on a small surface!
F
Use a cleaning scraper for glass ceramic surfaces to remove heavy dirt.
F
Oven spray may be used - however not on an enamel cook top.
Stainless steel
Stainless steel door front, control panel, telescopic glide-out shelves
(acc. No. 601)
[
Stainless steel is easily scratched! Do not use a cleaning scraper!
[
To avoid stains, remove calcium deposits, grease or starch as soon as
possible.
A stainless steel cleanser can be effective.
Clean all stainless steel surfaces weekly with a stainless steel cleanser. This
will create a protective film, which will protect the stainless steel surface from
discoloration.
Glass
Inside of the door – coated glass
[
IDon’t use oven spray. It can destroy the coated glass surface.
Use a cleaning scraper for glass ceramic surfaces to remove heavy dirt.
Door front, control panel
F
Clean the front of the oven, by using a damp cloth or soft sponge with
a mixture of warm water and mild detergent. You may use glass cleaning
agents.
Buttons
Clean the buttons with a mixture of warm water and mild detergent, with a
damp cloth or soft sponge.
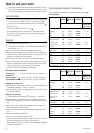
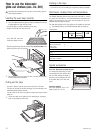
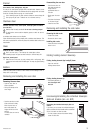
Removing and installing the oven door
Removing the oven door
– Open the oven door as
wide as possible.
– Fold up the clamps on the
door hinges.
– Grab the oven door on both
sides and close it slowly.
When the oven door is
about half-closed, the
hinges will fall out of the
catches.
The oven door can now be
removed.
Reassembling the oven door
– Grab the oven door on
both sides and push the
hinges into the
appropriate holes on
the oven.
– Slowly open the oven
door.
– Fold down the clamps
on the door hinges.
– Close the oven door.
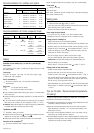
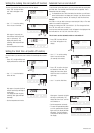
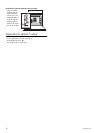
Removing and installing the side racks
Removing the side racks
– Loosen the screws.
– Remove the slot-in racks.
Installing side racks
– Insert side racks and tighten
down in front.
Folding heating element down/up
Folding heating element (top heat/grill) down
– Open lock and fold
heating element down.
Folding heating element up
– Fold heating element up
and close again with
the lock.
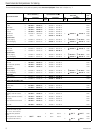
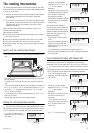
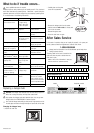
Unscrewing/reinstalling the individual telescopic
glide-out shelves (acc.-no. 601)
Unscrewing the individual telescopic glide-out
shelves
If you want, you can screw the individual telescopic
glide-out shelves off the side walls with a screwdriver
so that it is easier to clean the walls
– For this purpose unscrew the bottom holding
screw on each side.