


Installation Section 2
2-16
Part Number 020001552 5/11
INSULATING CONNECTIONS
1. Make sure all exposed carbonated water and syrup
lines are well insulated on towers to conduit, conduit
junctions, refrigeration unit to conduits, and drivethrough
junction.
2. To insulate the above, use the leftover conduit sections
and tape.
3. Cut the conduit sections to fit snugly over the exposed
lines and fittings. A little extra time spent doing a
thorough job initially will eliminate a call back in several
days to make corrections.
NOTE: Do not inject foam material directly on the
connections where the tubing connects to the barb fittings or
directly on poly tubing.
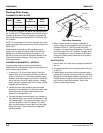
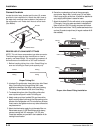
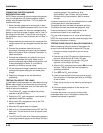
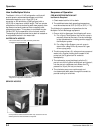
4. The can of foam is to be used to fill the openings
between the conduit insulation and the inside diameter
of the floor chases. The purpose is to provide an air tight
seal at the floor level to prevent foreign matter from
entering the chases. Please read the foam
manufacturer’s instructions carefully. We recommend
using the adapter with the right angle extension.
5. Insert the adapter into the openings approximately 1" to
2" (2.5 to 5.1 cm) while depressing the adapter.
6. Move the extension around throughout the area where
the foam is to be placed. Do not over fill, allow room for
expansion. If the chase opening is too deep insert a
section of the leftover conduit insulation in the opening
prior to using the foam insulation.
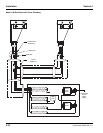
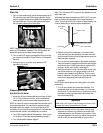
Aeroquip Connection
1. Lubricate male half diaphragm and synthetic rubber seal
with refrigerant oil.
2. Thread male coupling to its proper female half by hand
to ensure proper mating of threads.
3. Use proper wrenches (on coupling body hex and its
union nut) and tighten union nut until coupling bodies
“bottom”.
NOTE: You must use a wrench on the body to keep the
body from turning while tightening the nut with the second
wrench. If the body turns excessively, the piercing seal will
be damaged.
4. Use proper wrenches to tighten an additional 1/4 turn
(90°). This final 1/4 turn is necessary to ensure the
formation of a leak proof joint. Alternately, use a torque
wrench to tighten the 1/2” coupling to 40 ft-lbs and 3/8”
fitting to 11 ft-lbs.
5. Leak check all your connections. If you detect any leaks,
repair and recheck.
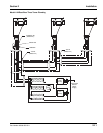
Condenser and Pre-charged Lines Installation
Before proceeding with installation, verify that all
requirements for roof mounted remote condenser units (if
applicable) have been satisfied. If unit has a remote
condenser, refer to the instructions on installing the remote
condenser supplied with the condensing unit and refer to the
section on installation of remote refrigeration line sets.
REMOTE CONDENSER REQUIREMENTS
1. Installation and maintenance are to be performed only
by qualified refrigeration personnel. These technicians
must have EPA certification (USA), are familiar with local
codes and regulations, and are experienced with this
type of remote refrigeration equipment.
2. As a condition of the warranty, the check, test and start-
up procedure must be performed by qualified personnel.
Because of possible shipping damage, check both the
condensing unit and refrigeration unit(s) for refrigerant
leaks.
3. If the refrigeration unit is located on a roll out platform,
you must coil up to one round between the back of the
stand and the wall. This allows pull out of the
refrigeration unit for servicing.
4. If the refrigeration unit is located in a stationary location,
you must remove excess refrigeration tubing as
described below.
Aerosol Foam
Chase
Important
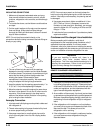
If you are installing a remote unit, there is a
refrigeration king valve located behind the
compressor. This valve must be back seated prior to
starting the compressor. Failure to do so will short
cycle and may damage the compressor.
APPROVED CONDENSERS
Multiplex Condenser - TS0895-271
MAC Multi-Pass Condensers