


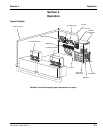

Section 3 Operation
Part Number 020001552 5/11 3-3
Start-up
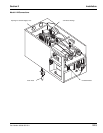
PLACING EQUIPMENT IN OPERATION
Before placing equipment in operation, verify that all
requirements for roof mounted Remote Condenser Units
(if applicable) have been satisfied. Refer to the
instructions on installing the Remote Condenser.
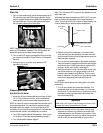
1. Fill the refrigeration unit water bath tank with water to
within 1/2” (1.27 cm) of the top of the overflow tube.
2. Open the manual water shut-off valve to the water
cooled condenser (if applicable).
3. Turn ON the rocker switch labeled “Refrigeration” to
begin building an ice bank.
4. Turn ON the rocker switch labeled “Agitator”.
5. Ice will begin to form on the evaporator coils in
approximately 2 hours.
6. The refrigeration unit will build an ice bank in
approximately 4 to 6 hours.
7. If optional CO
2
/Water Control Panel has been
installed on the refrigeration unit, refer to the
installation instructions for operation and testing the
circuits for leaks.
8. The carbonation circuits “A” and “B,” as well as the
syrup circuits must be checked for leaks and
possible cross circuits before turning ON the water
supply to carbonator pumps.
9. Turn on main water supply. Set incoming regulator
to 55 psi on the CO
2
panel; 25 psi for the Model 11M
root beer system’s internal regulator (must be lower
than CO
2
supply pressure). Once water is supplied
to the unit, air needs to be purged from the
carbonator tank. Do so by lifting press relief valve
tab until water comes out of relief valve.
10. Turn on main CO
2
supply. Set regulator initially to 90
– 100 psi. For the Model 11 Root Beer system, set
regulator initially to 26 psi; it can be raised
incrementally to 30 psi if there is excessive foaming.
11. Set bag-in-box syrup tank push pressure CO
2
regulator
to 65 – 70 psi. For the Model 11 Root Beer system, set
push pressure CO
2
regulator to 35 – 40 psi.
PLACING THE CARBONATION SYSTEM IN OPERATION
1. Open the CO
2
gas supply valve at CO
2
tanks or bulk
tank. Adjust the CO
2
pressure to 90 psi (6.2 bar).
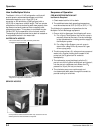
2. Open relief valve on top of the carbonator tank for 4
seconds to bleed off air in tank.
3. Turn ON the water supply to unit.
4. Turn ON the switch labeled “Carbonator Pump”.
Allow carbonator to run and cycle OFF.
5. Activate all valves until a smooth, continuous flow or
carbonated water and non-carbonated water appear
at the valves.
6. Turn ON switch labeled “Circulator”.
7. Allow at least 1 hour before proceeding to calibration
instructions. You may complete the sanitizing
instructions during this period.
Equipment Setup and Close Procedure
EQUIPMENT SETUP PROCEDURE
1. Ensure that all valve nozzles are attached to the valves.
2. Observe pressure of CO
2
high pressure tank of
500 psi (34 bar) or more, or bulk CO
2
tank of 150 psi
or more. Primary regulator set at 90 psi (6 bar) and
the secondary regulator set at 35 psi (2.4 bar).
3. Observe the control panel to verify that all pressure
gauges are set at correct operating pressures.
4. Check the syrup tanks to make sure a sufficient
number of tanks are connected in series to satisfy
business volume.
5. Clean syrup inlet and outlet quick disconnects at the
same time tanks are replaced. Rinse disconnects in
clean potable water.
EQUIPMENT CLOSE PROCEDURE
1. Clean the underside of the dispensing tower around
the nozzle area with a clean damp towel.
2. Pour at least 60 oz (1.8 liters) of warm water down
the drain openings.