18
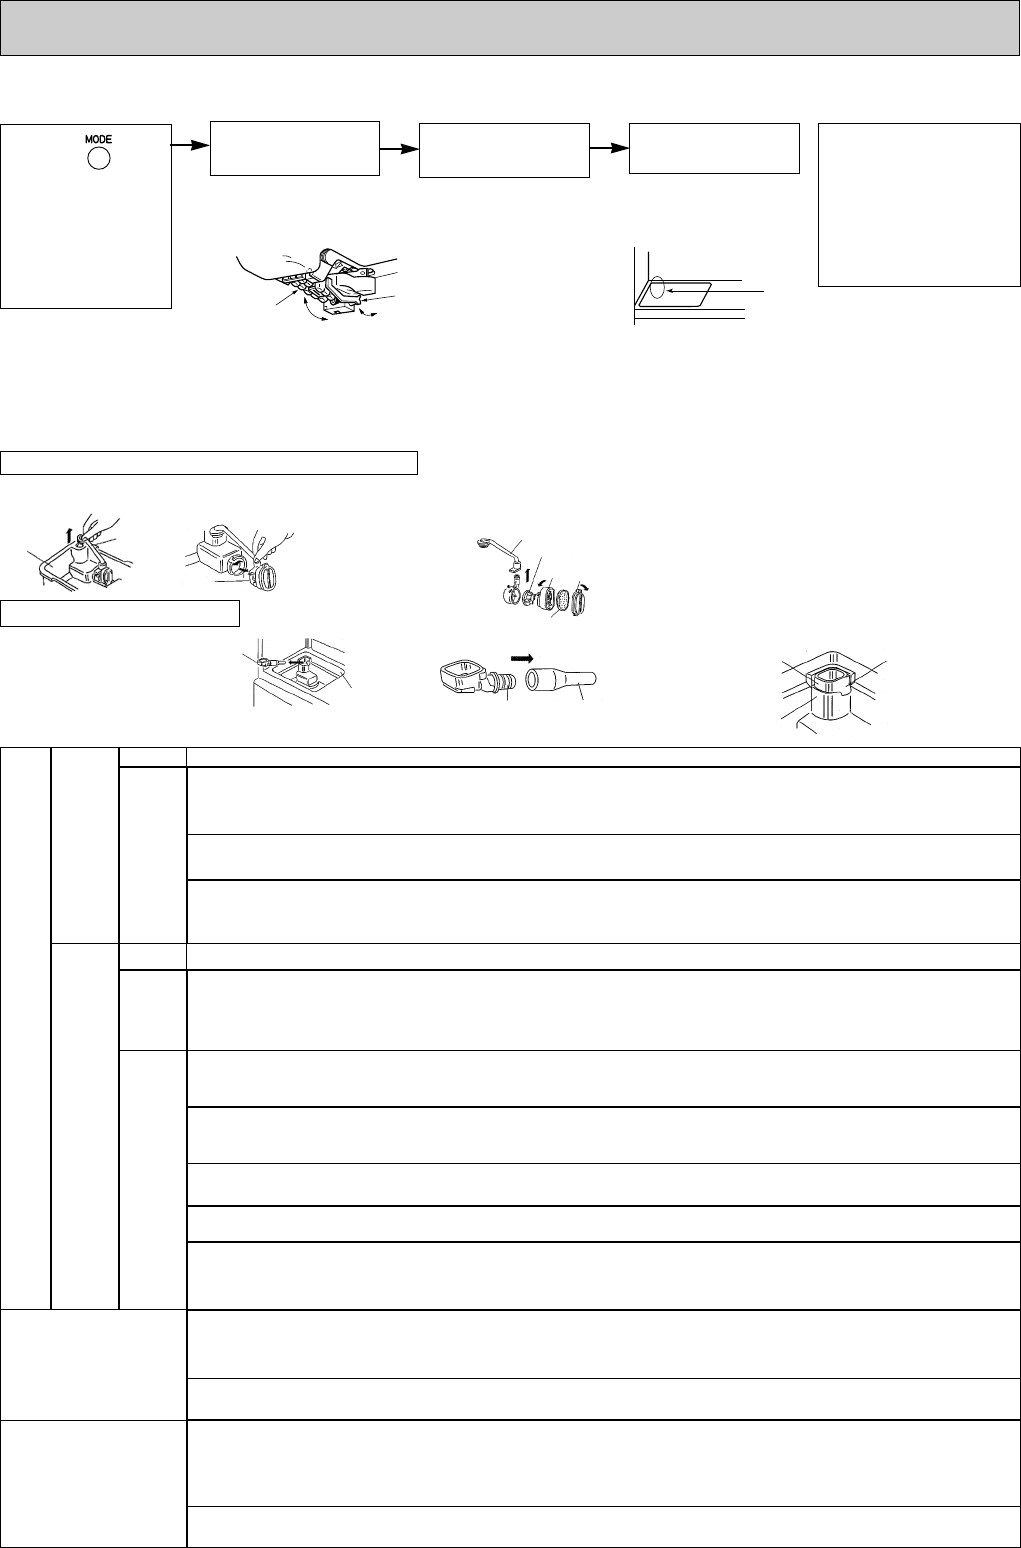
Ice making test completes
about 20 seconds later.
(3) Operation by ice making test
Press the switch
for 5 seconds or
more.
(See “• Self check
and error display
method and opera-
tion, 1 Ice making
test operation” at
page 14.)
Ice stock detective
lever detects the
amount of ice.
Detective lever once
come down to detection
point then return to the
original position.
The ice tray is
rolled over and the
system is reset.
The ice tray rolls
over once to drop
the ice, then return
to the original posi-
tion.
Water pump motor
is operates.
Remove the lid of
the water tank then
check the sounds
of water running.
Completion
When abnormality
occurs, the error code
is displayed on the
panel.
Inspect the abnormal
points by referring to
page 15, 16.
Ice tray
Detection lever
(Upper freezer compartment)
(Lower-left part of refrigerator compartment)
[Check point of automatic ice maker operation]
*Never touch the automatic ice maker while it is operating.
After the operational test, a popping sound is heard several times because the operation of three-way valve is checked auto-
matically. During the operation, do not insert a hand into the automatic ice maker.
(4) Maintenance for water pump and water pipe
Check here.
Water
supply
pipe
Water pipe · Tank holder
1. Pull out water supply
pipe. Wipe the tank
holder with clean cloth.
•Do not let water flow into
the tank holder.
packing
2. Separate pieces and wash with water.
Light-type bacteria removing filter
Water pump
1. Pull out the pipe.
2. Turn the tank
pump to detach.
5. Put the parts back in the reverse order of disa-
ssembly.
3. Pull out the tank pipe, turn the cap
to remove, and then wash
the propeller with water.
•The propeller is
made of the magnet.
Wash it well with water
so that no alien sub-
stance remains on it.
4. Remove the light-type bacteria removing filter
and wash it in water.
Normally the filter need not be replaced. However, replace it
in the following condition:
•When the filter is clogged by passing something other than
water through the filter.
•When the filter is broken.
In such a case, contact the dealer that you purchased this
refrigerator.
Cap
Propeller
Tank pipe
Cover
Tank
pipe
Water
tank
Water pump & Light-type bacteria removing filter
3. Reverse steps to replace the pipe.
Tank holder
Aluminum pipe
Side A
Side B
Water pipe
•Replace the water
pipe.
Be sure that sides A
and B fit flush to
each other.
•Twist the
aluminum
pipe to
replace it.
(5) Troubleshooting for automatic ice-maker
Trouble with ice-making
Water or ice is
on the ice tray
The ice-maker gear box may be defective, cooling may be poor or ice cubes may be full in the server.
3.Check if the temperature of the freezer com-
partment is cool enough.
(It takes longer to make ice during summer
time or if the door is frequently opened.)
2.Measure the resistance of ice tray thermistor
circuit.
1.Check inside of the ice server.
The water saucer may be defective, or the ice tray may get cracked.
4. Check the water pipe between the refrigerator
compartment and freezer compartment for dirt,
and foreign objects.
5.Check the condition of ice tray.
6.Disassemble the water pump and check the
inside of the pipe.
7.Tank pipe is clogged , has a hole or is not
properly installed.
8.Check the motor coil resistance.
9.Check if there are any dirt or foreign object
which are difficult to remove in the water tank.
Also, check if there is any crack or deformation
on the tank.
The ice does not
come out from
the tray
No water or ice
in the ice tray
Water in
water
saucer
No waterdrops in water saucer
Water in the tank
holder
Chained ice,
Water leaking from
the ice server
10.
Check the water pipe for dirt, and foreign
objects. Also, check the water pipe position and
connection.
11.
Check the water pipe (between F.compartment
and R.compartment) for clogging.
12.
Check the water pump operation by the ice-
making test.
13.
Water spill at the installation of water tank or more water over the full water level may cause to from
chained ice.
14.
Measure the water pump coil resistance.
•Ice cubes are not stored flatly
and the amount is detected as
full.
•Food inside the ice server
•Open circuit (∞') or
short circuit (0')
•Not enough
➔Inspection
➔Replace the ice tray
thermistor.
➔Poor cooling
➔Clean the water pipe.
➔Defrost
•Broken or cracked
•Not placed properly
➔Replace the tray.
➔Reinstall it properly.
•Dirt or foreign objects
➔Repair and explain to
the user for proper
usage.
•Clogging, disconnecting
•Hole or crack
➔Check the water
pump.
•Crack or deformation
➔Change the water
tank.
•Clogging, disconnecting
•Hole or crack
•Clogging ➔Clean / Remove the
dirt.
•Water filling time is longer
than 9 seconds.
➔Replace the control
board.
•Open or short circuit ➔Change the water
pump motor.
•Clogging
•Freezing (For freezing, check
the pipe heater resistance.
➔
Clean / Reinstall it properly.
➔Change the tank pipe.
•Open or short circuit
➔Clean / Reinstall it
properly.
➔Replace the pipe.
OA090-1.qxp 06.7.20 9:55 AM Page 18


