


www.oster.com
12
www.oster.com
13
Caution: The breadmaker is very hot DO NOT handle the machine while it’s operating.
After the EXPRESSBAKE® Breadmaker setting bread is baked
Caution: Do not put your face near the lid when you open the breadmaker, Hot steam may
escape that could burn you.
Important: The breadmaker has an automatic “keep warm” setting that will keep your
bread warm for up to one hour, We recommend however to remove the bread from the
breadmaker right away to preserve its freshness.
1 Use pot holders or oven mitts to carefully lift the pan by its handle from the breadmaker.
2 Turn the pan upside down onto a cooling rack and gently shake it until the bread comes
out. If it sticks, take a rubber spatula (metal can damage the pan’s surface) and carefully
go around the sides of the loaf until the bread comes out.
3 If the kneading blade comes out with the bread, use the included kneading blade
removal tool to remove it from the loaf, Remember, it will be hot!
Allow the bread to cool for 15 minutes before slicing and enjoying it.
Important: If you wish to make another loaf of bread right away, please allow the
breadmaker to cool down for 10 to 15 minutes with the cover open and the pan removed.
Using the Delay Timer
You can delay the time your bread maker starts to have fresh bread
ready when you get up in the morning or when you come from work.
We recommend that before you use the Delay Timer, you try out a
few recipes. Use recipes that have produced good results for you in
the past.
Important: You CANNOT use the Delay Timer for EXPRESSBAKE®
Breadmaker settings.
Before using the Delay Timer:
1 Add all of the ingredients of the recipe.
2 Select the correct setting for the kind of bread you are making (French, Sweet, etc.).
3 Select the crust color.
Caution: Do not use recipes with ingredients that can spoil like eggs or milk.
To Use the Delay Timer:
1 Figure out how many hours and minutes there are between now and when you want
nal, baked bread. For example, if it is 8:00 AM and you want bread ready for dinner at
6:00 PM, that is 10 hours.
2 Use the delay timer up button to advance the time in 10 minute increments. In our
example, you will do this until the timer reads “10:00.” If necessary, use the delay timer
down button to decrease the time. (To advance the time quickly, simply press and hold
down the delay timer up/down buttons.)
Important: If you make a mistake or wish to start over, press and hold down the “Start/
Stop” button until you hear a beep, then press the “Start/Stop” button one more time. The
display will show the original setting and cycle time. The delay timer is canceled and you
can start again.
3 When the delay timer is set where you want it, make sure to press the “Start/Stop”
button. The colon “:” will ash and your bread will be ready when you planned.
Important: When using the delay timer during times of hot weather, you may wish to
reduce the liquid in your recipe by 1 or 2 tablespoons. This is to prevent the dough from
rising too much. You may also reduce the salt by 1/8 or 1/4 teaspoons and try cutting the
amount of sugar you use by 1/4 teaspoon at a time.
Tips and Hints
Experienced cooks consider bread making to be as much of an art as a science. Keep in
mind that some recipes may require a little experimentation before they are exactly the
way you want them. Just don’t give up. Still, there are special hints to ensuring quality
bread almost every time.
Use Exact Measurements
We’ve already mentioned how important it is to use exact measurements when baking
bread, but it should be said again. Level o all dry ingredients and make sure that all liquid
ingredients are measured in a glass cup with the markings clearly labeled on the side.
Use Fresh Ingredients
You should always use fresh ingredients. The reasons are:
• Flour - If you have stored your our for a long time, it may have become wet from
absorbing moisture, or dry, depending on the area of the country in which you live.
We recommend using fresh bread our.
• Yeast - Fresh yeast is probably the most important ingredient in baking bread. If the yeast
is not fresh, your bread may not rise. It is better to buy new yeast than to take a chance on
yeast that has been stored for a long time.
You can test the freshness of your yeast. Simply ll a cup with warm water, then add and stir
in 2 teaspoons of sugar. Sprinkle a few teaspoons of yeast on the surface of the water and
wait. After 15 minutes, the yeast should foam and there should be distinct odor. If neither
reaction happens, the yeast is old and should be thrown away.
Add Ingredients in the Correct Order
Read all recipes from top to bottom, and remember:
- FIRST, liquid ingredients
- SECOND, dry ingredients
- LAST, yeast
Check the Doughball
This is a secret well known by people who make bread the old fashioned way. While hand
kneading the mixture, they adjust the consistency of the dough by adding a little our or
a little water until the doughball is just right. Although the breadmaker kneads the dough
for you, this secret is still true. Here’s what you should do.
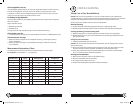
If the doughball is too wet
During the second kneading cycle, check the consistency of the doughball. If the doughball
appears sticky or wet, like pancake batter, sprinkle in our, a tablespoon at a time, until the
dough ball appears smooth, round, and dry and circles nicely in the pan.
CKSTBRTW20-BM-IB-RevC.indd 12-13 6/30/09 5:20:26 PM