


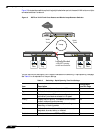

Configuring Switching
12
SonicOS 5.7: Advanced Switching Feature Guide and Screencast Tutorial
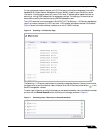
Editing VLANs
To edit a VLAN, perform the following steps:
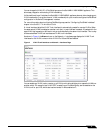
Step 1 On the Switching > VLAN Trunking page, click the Configure icon in the VLAN Table row for the
VLAN ID you want to edit.
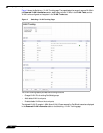
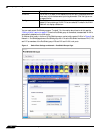
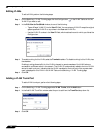
Step 2 In the Edit Vlan for PortShield window, do one of the following:
–
Type a different VLAN ID into the Vlan ID field. You can enter any VLAN ID except the original
system-specified VLAN ID or any others in the Reserved VLAN IDs.
–
Use the VLAN ID number in the Vlan ID field, which matches the one for which you clicked the
Configure icon.
Step 3 To enable trunking for this VLAN, select the Trunked checkbox. To disable trunking for this VLAN, clear
the checkbox.
Enabling trunking allows traffic for this VLAN to be sent to remote members of the VLAN who are
connected to a different switch in the network. The VLAN ID is automatically added to the list of VLAN
entries for each trunk port, indicating that the VLAN is enabled on the trunk ports. Also, a green check
mark is displayed for this VLAN in the VLAN Table on the Switching > VLAN Trunking page.
Step 4 Click OK.
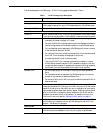
Adding a VLAN Trunk Port
To add a VLAN trunk port, perform the following steps:
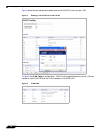
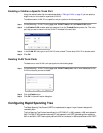
Step 1 On the Switching > VLAN Trunking page under VLAN Trunks, click the Add button.
Step 2 In the Add VLAN Trunk Port window, select the port to add from the Trunk Port drop-down list.
Step 3 Click OK.