


Configuring Switching
29
SonicOS 5.7: Advanced Switching Feature Guide and Screencast Tutorial
• Strict Priority Queue – When Strict Priority Queue is selected, packets containing an 802.1p tag or
DSCP marking with a priority level matching the Highest queue priority are forwarded or received.
Packets matching High, Normal or Low priority may be dropped.
Step 2 Click the Apply button.
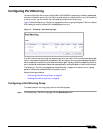
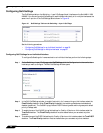
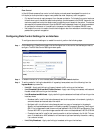
Configuring DSCP Mapping
You can configure the DSCP mapping by setting the priority levels for DSCP values 0 through 63. The
Switching > Layer 2 QoS page also provides a Reset DSCP Remap button to reset the priority levels back
to the default, which is “Normal.”
To configure DSCP mapping, perform the following steps:
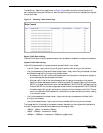
Step 1 To show the DSCP Remap table, click Hide/Show next to the DSCP Remap Table heading. The priority
settings for all DSCP values, 0 - 63, are displayed.
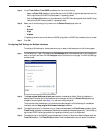
Step 2 For each DSCP value (0 - 63) that you want to change, select one of the following from the Priority
drop-down list:
• Low
• Normal
• High
• Highest
Step 3 Click the Apply button. The DSCP Remap table is hidden, but if you show it again you will see the updated
priority settings.
Step 4 To reset all DSCP mapping back to the default, Normal, click the Reset DSCP Remap button and then
click OK in the confirmation dialog box.
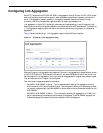
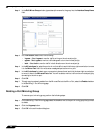
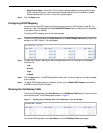
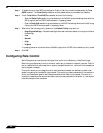
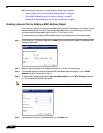
Showing the CoS Remap Table
To show the CoS Remap table, click Hide/Show next to the CoS Remap Table heading. The priority levels
cannot be configured. The CoS Remap table is shown in Figure 17.
Figure 17 Showing the CoS Remap Table on the Switching > Layer 2 QoS Page
To hide the CoS Remap table, click Hide/Show next to the CoS Remap Table heading again.