


............ www.truemfg.com ............
True Food Service Equipment, Inc.
10
10
INSTALLATION / OPERATION INSTRUCTIONS
A. Before your new unit is connected to a
power supply, check the incoming voltage with a
voltmeter. If anything less than 100% of the rated
voltage for operation is noted, correct immediately.
B. All units are equipped with a 7 ft. (2.1m) service
cord, and must be powered at proper operating
voltage at all times. Refer to cabinet data plate for
this voltage.
True requires that a sole use circuit be dedicated
for the unit. Failure to do so voids warranty.
WARNING
Compressor warranties are void if compressor
burns out due to low voltage.
WARNING
Power supply cord ground should not be
removed!
NOTE
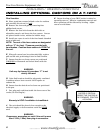
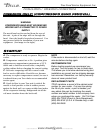
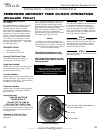
To reference wiring diagram - Remove front
louvered grill, wiring diagram is positioned on the
inside cabinet wall.
ELECTRICAL INSTRUCTIONS
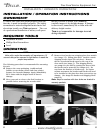
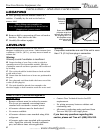
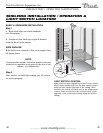
Step 1 - Position Cabinet
Allow one inch between the wall and rear of
the refrigerator to assure proper ventilation. For
freezers 3 inches between the wall and rear of the
cabinet will assure proper ventilation.
Step 2 - Level Cabinet
Cabinet should be level, side to side and front to
back. Place a carpenter’s level in the interior floor
in four places:
A. Position level in the inside floor of the unit
near the doors. (Level should be parallel to cabinet
front). Level cabinet.
B. Position level at the inside rear of cabinet.
(Again level should be placed parallel to cabinet
back).
C. Perform similar procedures to steps a & b by
placing the level on inside floor (left and right
sides - parallel to the depth of the cooler). Level
cabinet.
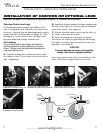
Step 3
Draw an outline on the base on the floor.
Step 4
Raise and block the front side of the cabinet.
Step 5
Apply a bead of “NSF Approved Sealant”, (see list
below), To floor on half inch inside the outline
drawn. The bead must be heavy enough to seal
the entire cabinet surface when it is down on the
sealant.
Step 6
Raise and block the rear of the cabinet
Step 7
Apply sealant on floor as outline in Step 5. on other
three sides.
Step 8
Examine to see that cabinet is sealed to floor
around entire perimeter.
Note:
Asphalt floors are very susceptible to chemical
attack. A layer of tape on the floor prior to
applying the sealant will protect the floor.
NSF Approved Sealants:
1. Minnesota Mining #ECU800 Caulk
2. Minnesota Mining #ECU2185 Caulk
3. Minnesota Mining #ECU1055 Bead
4. Minnesota Mining #ECU1202 Bead
5. Armstrong Cork - Rubber Caulk
6. Products Research Co. #5000 Rubber Caulk
7. G.E. Silicone Sealer
8. Dow Corning Silicone Sealer
SEALING CABINET TO FLOOR