


www.U-LineService.com 10 02/2005
™
CO2075FF — Ice Maker/Refrigerator
5. Remove the top handle and discard. (This handle will be
replaced with the Modified Handle included in the Full
Overlay Door Panel Kit.)
6. Remove the two screws located on both sides of the
lower handle. Remove the handle.
7. Attach the Modified Handle to the lower handle using
the three screws removed in Step 4. Set aside.
8. Slide the existing door panel out of the doorframe.
Attaching the Full Overlay Panel
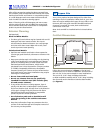
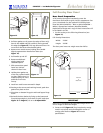
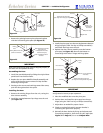
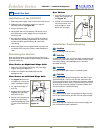
1. Tap nylon inserts into the top holes drilled in the
overlay panel. Use two #6 screws to attach top pivot
bracket to the overlay panel (see Figure 19).
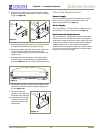
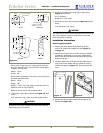
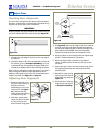
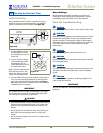
2. Place and tape the existing door panel on the back of
the overlay panel (see
Figure 20
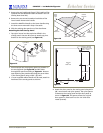
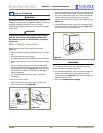
) and drill holes
through both panels according to
Figure 21
. Remove
tape adjoining the panels and enlarge the seven holes
in the overlay panel using a 0.201" (#7) drill.
3. If a user-supplied cabinet handle will be used, attach its
hardware to the overlay panel at this time.
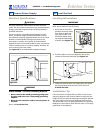
4. Attach the door panel to the overlay panel using #10 x
5/8" wood screws and nylon spacers. The nylon spacers
fit between the overlay panel and the door panel as
shown in
Figure 22
. The spacers
allow the original
door panel to slide back into the
1/4"-thick door
reveal (channel).
Typical Wood
Panel
Top Pivot
Plate
#6 X 5/8"
Flat Head Screw
Two Required
8 mm Plug Insert
Two Required
Figure 19
Removed
Door Panel
Bottom of
Wood Panel
Back of
Wood
Panel
Side of
Wood Panel
Tape
5/16"
Bottom
3/8"
Both Sides
Figure 20
Drill 5/32"
x
3/8" Deep
for usewith #10
x
5/8"
Wood Screw and Nylon
Spacer –
7 Places
1"
±
1/8"
1"
±
1/32"1"
±
1/32"
11-7/8"
14-5/16"
±
1/4"
27"
±
1/4"
Rear View
of
Wood Panel
Figure 21