


www.U-LineService.com 8 02/2005
™
CO2075FF — Ice Maker/Refrigerator
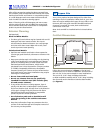
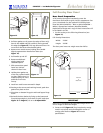
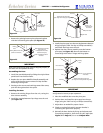
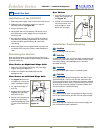
3. Pull door gasket out of groove (top edge of door only).
Start in the middle and pull outward, moving toward
the edge (see
Figure 13
). This may take some force. Do
not remove the three screws behind gasket.
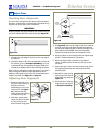
4. Remove two outside screws holding door handle.
Slightly separate door handle from door (see
Figure 14
).
5. Pull handle up and off.
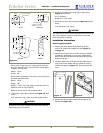
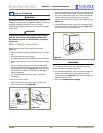
6. Remove and discard
existing panel and
cardboard spacer.
7. Slide custom door panel
insert into 1/4-inch
channel in door front.
8. Holding door gasket out
of the way, replace handle
on door, making sure it is
seated properly on insert
and that screw holes
line up.
9. Install two small screws removed in Step 4.
10. Starting at the corners and working inward, push door
gasket into place on door.
11. Place door on bottom hinge pin and install upper hinge
screw.
12. Reinstall the door shelves by lining up the bosses and
first pushing straight in, then down at a 45° angle (
see
Figure 37 on Page 15
). Go on to
5 Adjust Door
.
Full Overlay Door Panel
Door Panel Preparation
A full overlay door panel completely covers the
doorframe and handle to give a built-in appearance. See
your U-Line dealer for the optional Full Overlay Door
Panel Kit (P/N U-OL2075B — Black or P/N U-OL2075W —
White). Appropriate hardware, Modified Handle,
Replacement Hinges and a copy of these instructions will
be included in the kit.
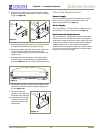
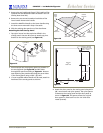
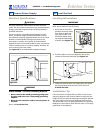
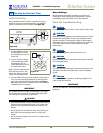
1. Cut the overlay to the following dimensions (see
Figure 15).
Full Overlay Dimensions:
Width: 23-3/4"
Height: 29-7/8"
The door panel must not weigh more than 20 lbs.
IMPORTANT
Rear View of wood panel for right-hand hinge shown. Use
mirror image for left-hand hinges.
2. Create a relief (
Figure 15
) for pivot plate by cutting
notch in top corner and coinciding back corner of
overlay panel. Refer to
Figure 16
for exact
specifications.
Figure 12 Figure 13
Figure 14
29-7/8"
23-3/4"
1/8"
13/16"
1/8"
Relief Notch
for Pivot Plate
Rear View
of
Wood Panel
3/4"
Figure 15