


www.U-LineService.com 6 02/2005
™
CO2075FF — Ice Maker/Refrigerator
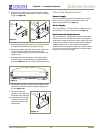
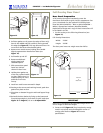
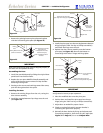
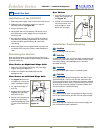
4. Remove the two door closer inserts from the existing
bottom hinge and install as shown on the new bottom
hinge (see
Figure 8
).
5. Remove existing bottom hinge (3 screws) and remount
on opposite side TOP. Remove hinge screw pin.
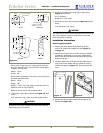
6. Remove the plastic hole plug from the top of the door
to allow the pivot pin to be inserted in the new
location. Install the plug into the vacated hole on the
opposite side.
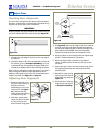
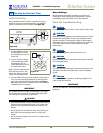
7. With bottom of door facing up, remove pivot plate
(2 screws), flip over, and remount on opposite side of
door (see
Figure 9
). Be sure notch in plate faces center.
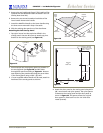
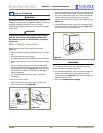
8. Holding door upright with top of door tilted forward,
place hole of door pivot plate on bottom hinge screw
pin (see
Figure 10
).
9. Tilt top of door into
position in top hinge and
install top hinge screw pin.
10. Install plastic screw plugs
removed in Step 2 in old
hinge holes (3 each, top
and bottom).
Other Site Requirements
Power Supply
The unit requires a grounded and polarized 115 VAC,
60 Hz, 15A circuit (normal household current). See
Electrical Specifications on Page 14.
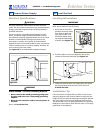
Water Supply
The unit requires a 1/4-inch OD water supply line and a
shut-off valve. For more information see Page 13.
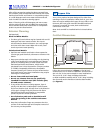
Environmental Requirements
The surrounding air temperature must be at least 50°F
(10°C) but must not exceed 110°F (40°C). High ambient
temperature ranges and warmer water supply will cause
reduced ice production. Black and White units may be
installed outdoors in a covered area. Stainless Steel
CO2075FF units are deemed suitable for outdoor use by
UL. The unit must not be located near heat-generating
equipment or in direct sunlight.
Hinge
Screw
Pin
Door
Closer
Inserts
Figure 7 Figure 8
Figure 9
Figure 10