


02/2005 15 www.U-LineService.com
™
CO2075FF — Ice Maker/Refrigerator
Installation of the CO2075FF
1. Open the water supply valve in the main water source.
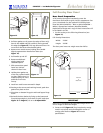
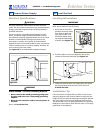
2. Make sure the cycle selector switch is in the OFF
(middle) position (see
Figure 38
).
3. Plug in the power cord.
4. Gently push the unit into position. Be careful not to
kink the drain or water supply line or entangle the
electrical cord.
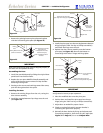
5. Re-check the leveling, from front to back and side to
side. Make any necessary adjustments. The unit’s top
surface should be approximately 1/8" below the
countertop.
6. Remove the tape from the glass shelves and wipe out
the inside of the unit with a clean, water-dampened
cloth.
Relocating the Shelves
Both the glass shelves in the refrigerator and the inner
door shelves can be moved to accommodate your bottles,
cans and containers.
Glass Shelves on Right-Hand Hinge Units
1. Open door fully, grasp shelf firmly, lift front edge
slightly, and pull straight out.
2. Choose new location and slide shelf onto the
appropriate rib.
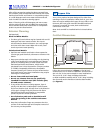
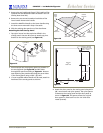
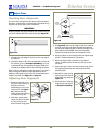
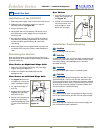
Glass Shelves on Left-Hand Hinge Units
1. See Figure 36. Pull shelf
out about 6” to clear the
wall’s molded protrusion.
2. Tilt right-hand edge of
shelf up.
3. Keeping at this angle and
hugging the right wall,
pull the shelf out.
4. Choose new location and
insert over ribs, tilting
right-hand edge up. Push
in, then lower shelf onto
ribs.
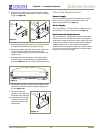
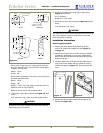
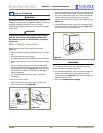
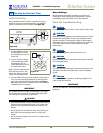
Door Shelves
1. First pull shelf up at a 45°
angle, then straight out
(see Figure 37).
2. Choose new location and
line up on bosses. First
push straight in, then
down at a 45° angle.
Installation Troubleshooting
Problem
Q
:
Water is leaking under the unit.
Solution
A:
A water leak under the unit is most likely caused by a bad
connection in the water supply line. Make sure the water
line’s brass fitting is screwed tight to its valve and
threaded correctly.
Problem
Q
:
The door remains open unless it is pushed closed.
Solution
A:
The hinges should be self-closing when the door is open
approximately 8
"
. If this is not the case, make sure the
closers (at the bottom of the hinge pin) are clean, greased
and installed correctly. Also, re-check leveling from front
to back of the unit and readjust if necessary. Make sure
that pivot plate is installed correctly.
Problem
Q
:
The custom overlay door was designed to align with the
rest of the cabinet doors, but the unit has crept forward.
Solution
A:
Make sure that the electrical cord and water supply line
are not obstructing the installation.
9 Install the Unit
1. Pull Out 6"
2. Tilt
3. Pull
Figure 36
Boss
Notch
Figure 37