


37
TToo ssttaarrtt tthhee SSeellff--CClleeaann ccyyccllee::
1. Close the door completely.
2. Turn the oven selector knob clockwise to the self-clean mode.
3. Turn the temperature control knob past the clean setting until the knob
stops. At this time, the clean indicator light will come on. Within 30
seconds the automatic door latch engages and the oven indicator light
comes on. The oven indicator light will remain on until the oven reaches
the self-clean temperature and will then cycle on and off during the self-
clean cycle. When the oven reaches the elevated temperature needed
for self-clean, the door lock indicator light comes on.
4. The door lock indicator light will remain on until the self-clean is
completed or interrupted and the oven temperature drops to a safe
temperature. A complete cycle is approximately 3 1/2 hours with an
additional 30 minutes needed for the oven to cool down enough for the
door latch to disengage.
5. When the cycle is completed, turn both the oven selector and
temperature control knob to the off position. When the oven has
completely cooled, open door and remove any ash from the oven
surfaces with a damp cloth.
TToo ssttoopp tthhee sseellff--cclleeaann ccyyccllee::
To cancel or interrupt the self-cleaning cycle, turn both the temperature
control knob and the oven function selector knob to "OFF". When the
oven temperature drops to a safe temperature, the automatic door latch will
release and the oven door can be opened. When the oven has completely
cooled, remove any ash from the oven surfaces with a damp sponge or
cloth.
SSeellff--CClleeaann CCyyccllee
This oven features an automatic pyrolytic self-cleaning cycle. During this
cycle, the oven reaches elevated temperatures in order to burn off soil and
deposits. An integral smoke eliminator helps reduce odors associated with
the soil burn-off. A powder ash residue is left in the bottom of the oven
after completion of the Self-Clean cycle. The door latch is automatically
activated after selecting the Self-Clean setting. The latch ensures that the
door cannot be opened while the oven interior is at clean temperatures.
WWAARRNNIINNGG
::
DDoo nnoott uussee ccoommmmeerrcciiaall oovveenn cclleeaanneerrss iinnssiiddee tthhee oovveenn..
UUssee ooff tthheessee cclleeaanneerrss ccaann pprroodduuccee hhaazzaarrddoouuss ffuummeess oorr ccaann ddaammaaggee tthhee
ppoorrcceellaaiinn ffiinniisshheess.. DDoo nnoott lliinnee tthhee oovveenn wwiitthh aalluummiinnuumm ffooiill oorr ootthheerr
mmaatteerriiaallss.. TThheessee iitteemmss ccaann mmeelltt oorr bbuurrnn dduurriinngg aa sseellff--cclleeaann ccyyccllee,, ccaauussiinngg
ppeerrmmaanneenntt ddaammaaggee ttoo tthhee oovveenn..
BBeeffoorree ssttaarrttiinngg tthhee SSeellff--CClleeaann ccyyccllee::
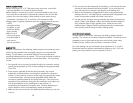
1. Remove the oven racks, rack supports, and any other items/utensils
from the oven. The high heat generated during the cleaning cycle can
discolor, warp, and damage these items. Do not use foil or liners in the
oven. During the Self-Clean cycle foil can burn or melt and damage the
oven surface.
2. Wipe off any large spills from the oven bottom and sides. Never use
oven cleaners inside a self-cleaning oven or on raised portions of the
door.
3. Some areas of the oven must be cleaned by hand before the cycle
begins. Soils in these areas will be baked on and very difficult to clean if
not removed first. Clean the door up to the gasket, the door frame, and
up to 2 inches inside the frame with detergent and hot water. Rinse
thoroughly and dry.
CCAAUUTTIIOONN
::
Do not touch the exterior portions of the oven after self-cleaning cycle has
begun, since some parts become extremely hot to the touch! During the
first few times the self-cleaning feature is used, there may be some odor
and smoking from the "curing" of the binder in the high-density insulation
used in the oven. When the insulation is thoroughly cured, this odor will
disappear. During subsequent self-cleaning cycles, you may sense an odor
characteristic of high temperatures. Keep the kitchen well-vented during
the self-cleaning cycle.
WWAARRNNIINNGG
BBuurrnn oorr EElleeccttrriiccaall SShhoocckk HHaazzaarrdd
Make sure all controls are OFF and oven is COOL before cleaning.
Failure to do so can result in burns or electrical shock.
36
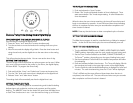
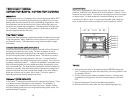
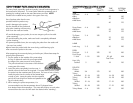
RReeppllaacciinngg IInntteerriioorr OOvveenn LLiigghhttss
CCAAUUTTIIOONN:: DDIISSCCOONNNNEECCTT TTHHEE EELLEECCTTRRIICC PPOOWWEERR AATT TTHHEE MMAAIINN
FFUUSSEE OORR CCIIRRCCUUIITT BBRREEAAKKEERR BBEEFFOORREE RREEPPLLAACCIINNGG BBUULLBB..
1. Unscrew glass light cover.
2. Use an oven mitt during bulb removal to
protect your hand in case the bulb breaks.
3. Replace the bulb with a 120 volt, 40 watt
appliance bulb.
4. Replace the light cover.
5. Reconnect power at the main fuse or circuit
breaker