


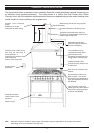

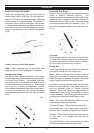
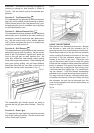
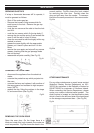

USING THE ROTISSERIE
Remove the oven shelves from the oven. Skewer
the chicken or meat with the rotisserie spit, A,
ensuring that the food is well balanced on the spit.
Place the pointed end of the spit into the rotisserie
motor coupling B situated at the back of the oven
and hook it into the rotisserie support hook, C,
located at the front of the oven. Place the oven
tray on the bottom shelf runner to catch the juices
& fats and the rotisserie rotates when the rotisserie
button is pressed. Put approx 2mm dept of water
into the oven tray to prevent fat from burning onto
it and leave the door slightly ajar. For overall cook-
ing use function 1 with the desired temperature
selected and for overall browning select function 2.
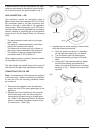
For easy removal of the spit, screw the black plas-
tic handle onto the end of the spit. When not using
the rotisserie, the spit can be removed from the
oven and the support hook can be stored away as
shown in Fig.19.
Function 2: Top Element Only
This operates the top element at the maximum set-
ting only, and is suitable for the browning of dishes.
Set the control knob to the “top element only” sym-
bol and place the food in a suitable tray or grill pan
on shelf positioned or two.
Function 3: Bottom Element Only
This operates the bottom element at the maximum
setting only and is suitable for the slow cooking of
casseroles, pizzas & stews and also plate warm-
ing. Set the control knob to the “bottom element
only” symbol and place the food in a suitable tray
or grill pan on shelf position 3.
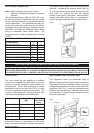
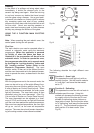
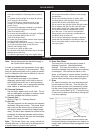
Function 4: Grill Element
This operates the top grill element at the maximum
setting only and is used for grilling. Set the control
knob to the “Grill Element” symbol and place the
food on the grill pan on shelf position one. the
oven door should be kept closed unless grilling
foods with a high water content. When keeping the
door open during grilling, the grill heat deflector
should be fitted into the two slots on the front to
protect the control knobs as shown in Fig. 17.
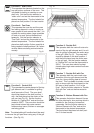
The detachable grill handle should be used to
remove the hot grill pan when finished. (See Fig.
14).
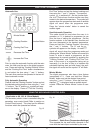
Function 5: Oven Light
This operates the oven light only and does not start
any of the cooking functions. Set the control knob
to the “Oven Light” symbol.
Fig.19
Fig.18
18
Fig.17
thermostat. This method of cooking is suitable for
roasting or baking on shelf position 3 (Refer to
Fig.16). Set the control knob to the desired tem-
perature.
B
C
A