


Page 5
Evaporator and Condenser Fan
Set Buon
•View Set Point
1
•Change Set Point
3-5
•SET + Down = CPSM
10-15
•Reset Hi & Lo Buon
3-5
ALARM Pre-Chill Display
Evap. Coil is 26°, turns off
when coil reaches 40°
Control “ON/OFF” Buon
•
Turns the Cooling Unit
“ON/OFF”
1
Defrost Compressor
Energy Reducon
Hi Bole Temp History & Scroll
Buon
1
Low Bole Temp History & Scroll
Buon
Push to see the min. stored temperature.
In programming mode use to browse the
parameter codes or decrease
the displayed value.
1
Energy Saving
Buon
1
Display and modify set point. In
programming mode it selects a
parameter conrms an opera-
tion. Hold for 3 seconds when
the min or max temperature is
displayed to RESET.
Cellar “Pre-Chill” Buon
3-5
Push to see the max stored temperature.
In programming mode use to browse the
parameter codes or increase the display
value. Hold for 3 seconds to start fast
freezing cycle.
Evaporator and Condenser Fan
Set Buon
•View Set Point
1
•Change Set Point
3-5
•SET + Down = CPSM
3 - 5
•Reset Hi & Lo Buon
3-5
ALARM Pre-Chill Display
Control “ON/OFF” Buon
•
Turns the Cooling Unit
“ON/OFF”
1
Defrost Compressor
Hi Bole Temp History & Scroll
Buon
1
Cellar “Pre-Chill” Buon
3-5
Low Bole Temp History & Scroll
Buon
Push to see the min. stored temperature.
In programming mode use to browse the
parameter codes or decrease
the displayed value.
1
Inacve
Display and modify set point. In
programming mode it selects a
parameter conrms an opera-
tion. Hold for 3 seconds when
the min or max temperature is
displayed to RESET.
Push to see the max stored temperature.
In programming mode use to browse the
parameter codes or increase the display
value. Hold for 3 seconds to start fast
freezing cycle.
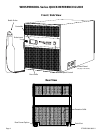
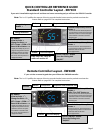
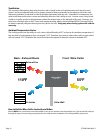
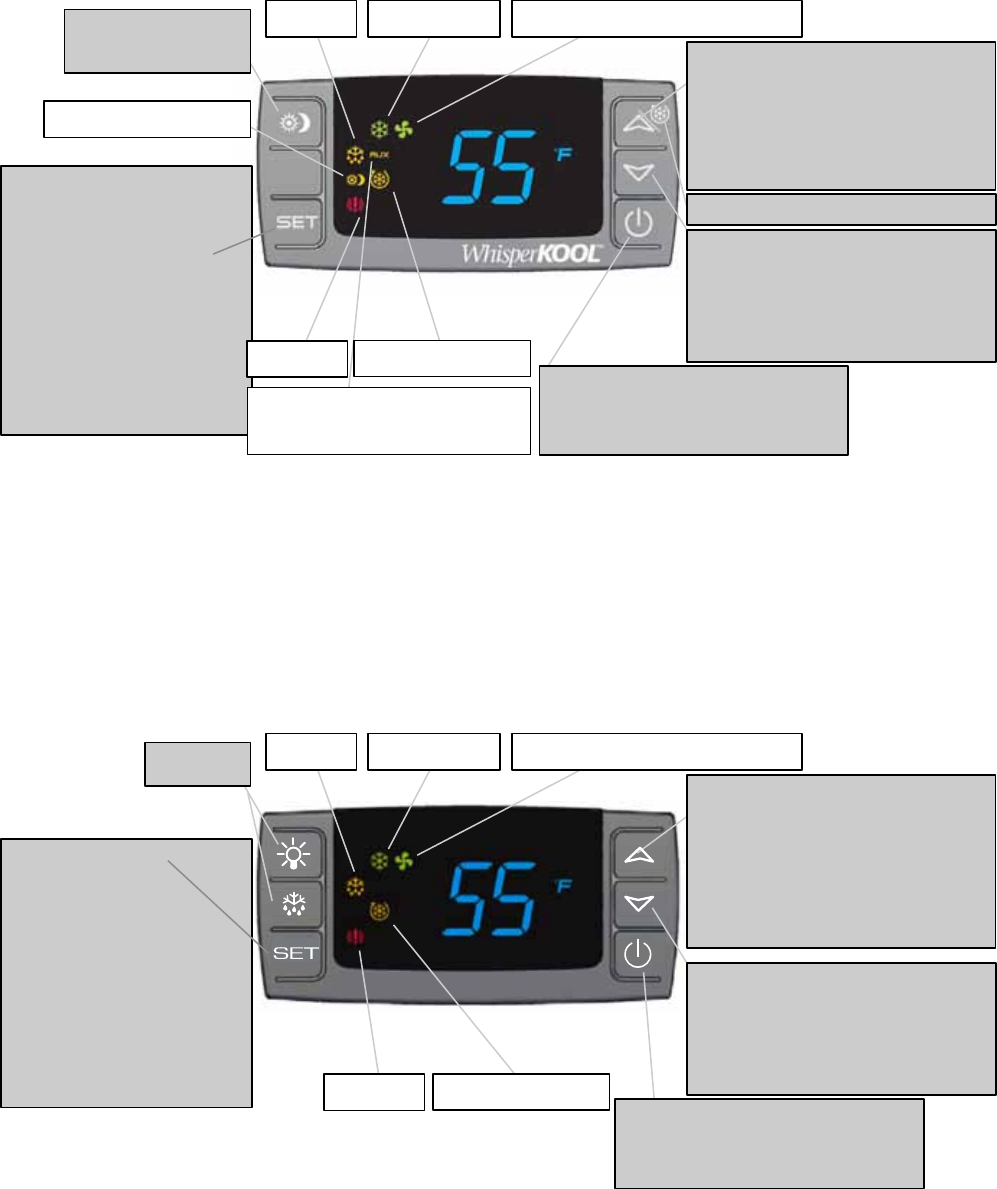
DIXELL
QUICK CONTROLLER REFERENCE GUIDE
Standard Controller Layout - XR70CX
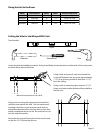
If your unit is installed through the wall and does not have a remote keypad you will have the XR70CX Controller
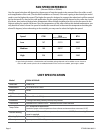
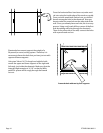
Remote Controller Layout - XW260K
If your unit has a remote keypad then you will have the XW260K controller
Note: The 1 or 3-5 qualies the amount of time in seconds that the button must be pushed to activate the
feature. Refer to page 25-27 for complete instructions.
Note: The 1 or 3-5 qualies the amount of time in seconds that the button must be pushed to activate the
feature. Refer to page 29-31 for complete instructions.