


8
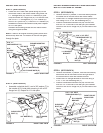
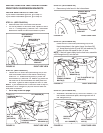
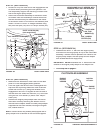
STEP 4: (SEE FIGURE 4)
•
Assemble a shoulder bolt (L) and a 3/8" washer (T) to
the outside of R.H. side plate, securing it with a 3/8"
fl anged nut (X). Repeat for L.H. side plate.
FIGURE 4 RIGHT SIDE VIEW
FIGURE 3 RIGHT SIDE VIEW
5/16"
NYLOCK
NUT (Y)
5/16" x 1"
CARRIAGE BOLT (J)
ENGINE MOUNTING
PLATE
(4) 1/2" WASHERS (R)
(3) 3/8" FLANGE NUTS (X)
(3) 3/8" x 1"
CARRIAGE
BOLTS (G)
SEE NOTE
3/8" WASHER (T)
SHOULDER
BOLT (L)
3/8" FLANGED
NUT (X)
INSTALL SIDE PLATES
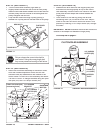
STEP 3: (SEE FIGURE 3)
•
Fasten the R.H. Side Plate (bend facing out) to the
front three holes in the tractor frame using three 3/8"
x 1" carriage bolts (G), three 1/2" washers (R) (see
note) and three 3/8" fl ange nuts (X).
For the rear hole,
use a 5/16" x 1" carriage bolt (J), a 1/2" washer (R)
and a 5/16" nylock nut (Y).
Place the 1/2" washers (R)
between the tractor frame and the side plate. Repeat
for L.H. side plate.
•
Reinstall the browning shield onto the tractor frame
using the original screws.
NOTE:
If there is an engine mounting plate (shown with
dotted lines) leave the 1/2 washer off the bolt that goes
through the plate.
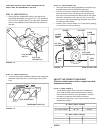
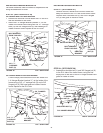
INSTALL HANGER BRACKETS AND SHOULDER
BOLTS TO OUTSIDE OF FRAME
STEP 5: (SEE FIGURE 5)
•
Remove the bolt, if present, in the hole directly behind
the brake rod on the left side of the tractor frame.
•
Attach the L.H. Hanger Bracket (tube facing out) to the
hole using a 5/16" x 3/4" self threading bolt (F).
• Install a round head shoulder bolt (M) into the hole
that is 9-1/2" to the rear of the bolt you just installed.
Secure it with a 3/8" fl ange nut (X) on the inside of the
frame.
FIGURE 5 LEFT SIDE VIEW
5/16" x 3/4" SELF
THREADING BOLT (F)
L.H. HANGER
BRACKET
BRAKE ROD
3/8" FLANGED
NUT (X)
SHOULDER
BOLT (M)
5/16" x 3/4" SELF
THREADING BOLT (F)
R.H. HANGER
BRACKET
RIGHT END OF
BRAKE ROD
3/8" FLANGED
NUT (X)
SHOULDER
BOLT (M)
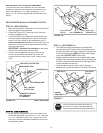
STEP 6: (SEE FIGURE 6)
•
Remove the bracket, if present, from the hole directly
behind the end of the brake rod on the right side of
the tractor frame. Store the bracket and bolt.
•
Attach the R.H. Hanger Bracket to the hole using a
5/16" x 3/4" self threading bolt (F).
• Install a round head shoulder bolt (M) into the hole
that is 9-1/2" to the rear of the bolt you just installed.
Secure it with a 3/8" fl ange nut (X) on the inside of the
frame.
FIGURE 6 RIGHT SIDE VIEW