


INSTALLATION
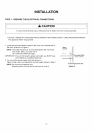
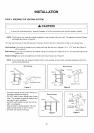
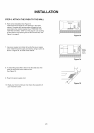
STEP 4: PREPARE THE WALL AND UPPER CABINET FOR INSTALLATION
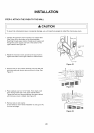
[ _ CAUTION ]
To avoid personal injury or property damage, do not ateempt to install this microwave oven if you cannot find a
wall stud.
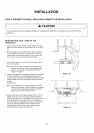
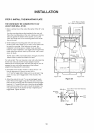
MEASURE AND TACK / TAPE UP THE
TEMPLATES
1. Using a plumb line and (metal) measuring tape, find and
mark the vertical center line on the back wall, as in Figure
22.
2. Find and mark one or two points where the studs are on
the wall (Studs are normally 16 inches apart.) and then
measure and mark the stud locations. If you cannot find
any wall stud, consult a local building contractor.
3. Line up the plumb line on the wall with the center line on
the mounting plate.
NOTE: Be sure the minimum width is 30 inches and the
distance from the top of the mounting plate to the
range or counter top is at least 30 inches. See
Figure 4 on page 4.
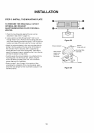
4. Center mounting plate in operating by lining up the plumb line
on wall with centerline on mounting plate. Make sure the
minimum width is 30 inches and that the top of the mounting
plate is located a minimum of 30 inches above the cooking
surface.
See Figure 23.
NOTE: f the cabinets are not plumb, adjust the mounting
plate to the cabinets• If the front edge of the cabinet
is lower than the back edge, adjust the mounting
plate to be level with the cabinet front.
5. Measure the bottom of the upper cabinet frame. Trim the
edges "A" "B" and "C" on the upper cabinet template so
that the template will fit on the bottom of the upper cabinet.
If upper cabinet has a recessed frame, trim template so
that it fits inside the recessed area. Align the centerline of
the upper cabinet template with the centerline of the
mounting plate; then securely tape or tack the upper
cabinet template in place. See Figure 23
O
O
Figure 22
O O
==_ • •
Figure 23
O
16