


Operation
20
Oven Adjustments for Cooking
The combination of belt time, oven temperature,
and air flow are important for achieving quality re-
sults from your Blodgett conveyor oven. Use the
following guidelines to adjust the belt time and
oven temperature of your unit. For questions re-
garding further oven adjustments, please contact
your local Blodgett Sales Representative for assis-
tance.
CONVEYOR SPEED AND O VEN TEMPERA TURE
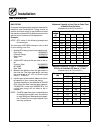
Conveyor belt speed (cook time) and oven tem-
perature are the two variables used when fine tun-
ing your oven for a specific product. To determine
the optimum bake time and temperature, make
small changes for each trial and keep one variable
constant. For example, if the oven temperature is
460_F (238_C) and the belt speed is 7 minutes,
but the pizza is not browned enough, increase the
temperature to 475_F (246_C) and keep the belt
speed the same. However, if the center of the pizza
is not completely cooked, keep the oven tempera-
ture the same, and increase the bake time to 7
minutes and 30 seconds. In general, raise the
bake temperature to increase browning, and
lengthenthebaketimetoincreasedoneness.
FINISHED PRODUCT TEMPERATURES
Internal temperatures of the cooked products
should be measured immediately after the prod-
uct exits the cooking chamber to ensure a safe
food temperature. Internal pizza temperatures
should be over 165_F(74_C). Minimum tempera-
ture guidelines vary depending on the food items.
AIR FLOW ADJUSTMENTS
Slide the product clearance adjustment plates to
the lowest possible setting for your menu items.
Low ering the clearance plates will reduce the
amount of hot air escaping from the chamber
openings.
Most often, the ideal oven settings can be dialed
in w ithout making anychanges to the airplate. The
oven configuration should not be modified unless
the oven time and temperature adjustments have
proven unsuccessful.
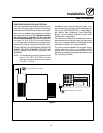
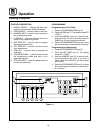
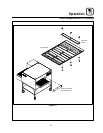
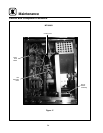
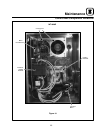
Air flow adjustments may be necessary to fine
tune the oven for your particular product. The air
plate, located at the top of the baking chamber,
containsholes that can be covered using Block-off
Plates. The plates can easily be adjusted to regu -
late the air flow for your particular needs. Use the
following guidelines to adj u st the Block-off Plates.
SeeFigure15.
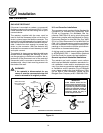
1. Ensure the oven is OFF and co mpl etely c o ol ed.
2. Remove the product clearance a djustment
plate from t he idle side of the oven.
3. Pulltheairplateoutoftheoven.
4. Remove the wing nuts, screws, and wa shers
holding the Block-off Plates.
5. Adjust the plates.
6. Replace the wing nuts, screws, and washers
to tightly secure the Block-off plates in their
new locations. Make a sketch of the final air-
plate setup for future reference.
7. Replace the air plate and product clearance
adjustment plate.
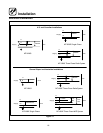
The following examples illustrate air flow regula-
tion.
NOTE: The first half of the oven chamber greatly
affects the initial baking of the product,
while the last half largely affects thebrown-
ing.
D
A good bake time and temperature have been
established, but more top browning is desired.
Slide one of the B lock-off Plates to uncover a
row of holes toward the exit end of the oven.
D
The bottom ofthe pizza is golden brown, but the
top is too dark. Close rows at the exit end of the
oven to reduce final browning.
D
The center of the pizza is still doughy and the
toppings are not fully cooked. Open up rows a t
the chamber entrance and close rows at the
chamber exit.