


15
SERVICE (CONT.)
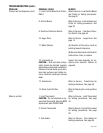
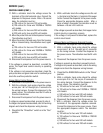
AUGER DRIVE COMPONENTS
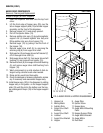
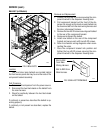
FIG. 3 AUGER DRIVE & HOPPER DISASSEMBLY
1. Hopper Lid
2. Hopper
3. Wiper Shaft
4. Wiper Blade
5. Wiper Drive Gear
6. Auger Drive Bracket
7. Spacer
8. Hopper Base
9. Washer
10. Retainer Clip
11. Hopper Support Plate
12. Auger Drive Shaft
13. Auger Wire
14. Ejector Elbow
15. Hopper Assembly
16. Auger Motor Bracket
17. Auger Motor
18. Dust Seal
19. Auger Motor Mounting
panel
1
2
6
7
8
9
10
3
4
5
12
13
14
15
16 17 18 19 11
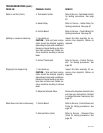
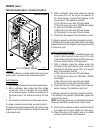
P2633
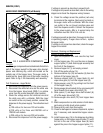
RED to Control Board
BLK to GRN from
Control Board
P1639
FIG. 4 AUGER MOTOR TERMINALS
Auger Drive Motor (Refer to Fig. 2)
1. Remove hopper assy (15), and set aside for reas-
sembly.
2. Remove the four #8-32 screws securing the hopper
support plate (11), remove plate and set aside for
reassembly.
3. Remove the four #8-32 screws, located inside the
dispenser housing on the lower right front of the
auger motor mounting panel (19), securing auger
motor mounting bracket (16) and auger motor
(17) to the rear of the auger motor mounting panel
(19).
4. Disconnect the wires from the hopper drive
board.
5. Remove auger motor mounting bracket (16), auger
motor (17) and dust seal (18) as an assembly.
6. Remove dust seal (18) from auger motor (17).
7. Disconnect the wires from the auger motor (17).
8. Remove the four #8-32 screws securing the auger
motor (17) to the auger motor mounting bracket
(16).
9. Remove auger motor (17) and discard.
10. Using four #8-32 screws install new auger motor
(17) on mounting bracket (16).
11. Install dust seal (18) on auger motor shaft and align
notch in seal with motor casting.
12. Reconnect the wires to the terminals on the hopper
drive board.
13. Refer to schematic wiring diagrams when recon-
necting the wires.
14. Using four #8-32 locking screws install auger mo-
tor, dust seal and mounting bracket to the rear of
the auger motor mounting panel (19).
15. Install hopper assy (15).
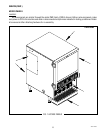
FMD-4 shown
42672 122209