


39
D. Date
To set the Date from the Setup Menu:
• If the power is off for more than three days, the date must be re-entered
1. Select “Date” with the Selector Dial.
2. Confirm by pressing the Smart Key.
3. The display shows the date formats available.
4. Select the desired format with the Selector Dial.
5. To enter the current date, use the Scroll (arrow) keys to switch between day, month and year
6. Set the correct date with the Selector Dial.
7. Confirm by pressing the Smart Key.
E. Order of Cookbook Recipes
To organize recipes alphabetically or numerically in the Cookbook with the Setup Menu:
1. Select “cookbook alphabetic”
with the Selector Dial.
2. Confirm by pressing the Smart Key.
3. Use the Selector Dial to select “Yes” to sort alphabetically, OR select “No” to sort numerically.
4. Press the Smart Key to confirm the selection.
5. “Please wait” appears in the display. The sorting may take some time.
6. When the sorting is complete, the MINI returns to cooking mode.
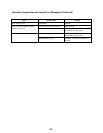
F. Default and Memory Settings
NOTES:
• Select whether the default or the memory setting (i.e. the last setting used) for cooking time and
temperature appears in the display when a cooking mode (cooking mode) is selected.
• Using the default settings helps prevent mistakes by semi-skilled staff.
• Every time a cooking mode is selected, the settings are stored.
• Memory settings are suitable for cooking several batches one after the other. Time and
temperature are set and the cooking mode can be started immediately
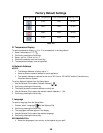
• The factory default settings are adjustable (See Table 12-1).
To select Default or Memory Settings from the Setup Menu:
1. Select “practical settings” with the Selector Dial.
2. Confirm by pressing the Smart Key.
3. To use default settings: select “no” with the Selector Dial and press the Smart Key.
• The MINI uses default settings.
4. OR To change the default settings: Select “yes” with the Selector Dial and press the Smart Key.
5. The display shows a list of the default settings set.
6. Select the default setting to change with the Selector Dial.
7. Use the Scroll RIGHT (arrow) key to space through to the desired number
8. Set the required default setting with the Selector Dial.
9. Use the Scroll LEFT (arrow) key to space back to accept the setting.
10. To change more settings, repeat the procedure above.
11. Press the Smart Key to confirm the new settings.