


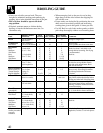
To avoid possible burns, place the shelves in the
correct position before you program the oven.
You can set the oven control to delay-start the oven,
cook for a specific length of time and then turn off
automatically.
For example: Let’s say it’s 2:00 and dinner time is
shortly after 7:00. The recipe suggests 3 hours baking
time at 325°F. Here’s how:
1. Press the BAKE pad.
2. Press the + or – pad until “325°” is displayed.
3. Press the COOK TIME pad.
4. Press the + pad until “3HR:00” appears in the
display. A Cook Time of 3 hours now appears in
the display.
5. Press the STOP TIME pad. The display prompts you
to set the Stop Time you want. It also shows the
earliest Stop Time you can set. In this example,
“5:00” and “STOP TIME” appear in the display. The
control automatically sets Stop Time by adding the
Cook Time to the time of day. In this example, the
time of day is 2:00 and the Cook Time is 3 hours.
Adding 3 hours to the time of day equals 5:00.
6. Change the Stop Time from 5:00 to 7:00 by
pressing the + pad until “7:00” and Stop Time
appear in the display. The words “DELAY TIMED
BAKE” appear in the display. At 4:00, the oven
will turn on automatically. When the oven starts to
heat, the word “ON” and the changing temperature,
starting at 100°F., will be displayed. The oven will
cook for the programmed 3 hours and shut off
automatically at 7:00.
7. At the end of Timed Baking, the display will show
“0HR:00 COOK TIME” and the oven will turn off.
The end of cycle tone will sound.
8. Press the CLEAR/OFF pad to clear the display
if necessary. Remove the food from the oven.
Remember, even though the oven shuts off
automatically, foods continue cooking after the
controls are off.
NOTE: Foods that spoil easily such as milk, eggs,
fish, stuffings, poultry and pork should not be allowed
to sit for more than one hour before or after cooking.
Room temperature promotes the growth of harmful
bacteria. Be sure that the oven light is off because heat
from the bulb will speed harmful bacteria growth.
How to Set Delay Start and Automatic Stop
Quick Reminder:
1. Press the BAKE pad.
2. Press the + or – pad to select the oven
temperature.
3. Press the COOK TIME pad.
4. Press the + or – pad to set the length of
Cooking Time.
5. Press the STOP TIME pad.
6. Press the + or – pad until the desired
Stop Time appears in the display.
Regular Timed Baking Adjust the Oven Thermostat
You may find that your new oven cooks differently
than the one it replaced. We recommend that you
use your new oven for a few weeks to become more
familiar with it, following the times given in your
recipes as a guide.
If you think your new oven is too hot or too cold,
you can adjust the thermostat yourself. If you think
it is too hot, adjust the thermostat to make it cooler. If
you think it is too cool, adjust the thermostat to make
it hotter.
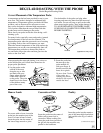
We do not recommend the use of inexpensive
thermometers, such as those found in grocery stores,
to check the temperature setting of your new oven.
These thermometers may vary 20–40 degrees.
The thermostat adjustment for Baking does not affect
Convection Baking or Convection Roasting. To adjust
these, press the CONV. BAKE or the CONV. ROAST
pad instead of the BAKE pad when following the
directions under To Adjust the Thermostat.
To Adjust the Thermostat:
1. Press the BAKE pad.
2.
Select an oven temperature between 500°F. and 550°F.
3. Immediately, before “ON” appears, press and
hold the BAKE pad for about 4 seconds. The time
display will change to the oven adjustment display.
4. The oven temperature can be adjusted up to (+)
35°F. hotter or (–) 35°F. cooler. Use the + or – pad
to select the desired change in the display.
5. When you have made the adjustment, press the
CLEAR/OFF pad to go back to the time of day
display. Use your oven as you would normally.
NOTE: This adjustment will not affect the broiling
or self-cleaning temperatures. It will be retained in
memory after a power failure.
33
ADJUST THE OVEN THERMOSTAT—DO IT YOURSELF!