


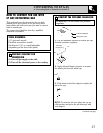

STEP 9
INSTALL THE DUCTWORK
• Ducting must conform to local code materials
and “make-up” requirements—300 CFM
minimum.
• IMPORTANT: Save for local electrical
inspector’s use.
• Ducting a cooktop is easy but critical for
proper performance.
• After reading these instructions, plan the
duct run.
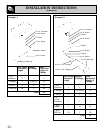
• Use the “Duct Length Chart” to find the
equivalent length of the run.
• Shift the blower to “high range” if indicated
(done by snapping the “restricter ring” out of
the blower inlet). Be sure blower is not running.
• Install the duct hardware.
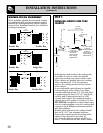
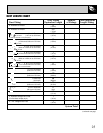
GENERAL CONSIDERATIONS:
1. Use 6" diameter round or 3
1
⁄
4
"x10" rectangular
only except as follows: For gas models, 5"
diameter round must be used if the straight duct
length is 10 feet or less, using 5" round wall cap.
2. Do not use 5" elbows except in a 5" system.
Instead, use a 5" to 6" transition followed by a
6" elbow, or a 5" to 3
1
⁄
4
"x10" elbow transition.
IMPORTANT
Total allowance duct system is:
90' with 6" round wall cap
80' with 3
1
⁄
4
"x10" wall cap
Low range is up to 60'
High range is 61 to 90
'
23
3. Use quality metal duct of at least 26 gauge
galvanized or 24 gauge aluminum. Inferior
quality pipe and fittings can cause up to twice
the restriction shown and is a poor value. See
the Prepare for Duct Work section of this guide
for optional under-slab ducting. Local codes may
require a heavier gauge material or restrict PVC.
4. Distance between adjacent fittings (elbows,
transitions, etc.) should be at least 18". The
farther the better. Closer distance promotes
turbulence which reduces airflow.
5. The number of downstream elbows or
transitions should be limited to three. The initial
5" to 6" straight transition, if used, need not be
counted in this number.
6. Handmade crimps are likely to cause restrictions.
7. If an alternate wall or roof cap is used, be
certain duct size is not reduced, and that there is
a backdraft damper. It is best to use listed caps
to be certain of proper performance.
8. Thermal breaks: In areas of extreme cold
weather, it may be necessary to provide a short
length of nonmetallic duct as close to the wall
as possible, to prevent conduction along the
metal duct.
9. High altitude installations: It is advisable to
reduce allowable duct run by 20%.
10. Follow the duct calculation in this guide
carefully for best performance and satisfaction.
STEP 8
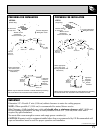
PLAN THE DUCT RUN
1. Make a sketch of the total system. Identify the
type of each fitting and the length of straight pipe.
2. Enter your run into the Duct Length Chart in
this guide. Elbows, wall caps and other fittings
are shown in the chart with their equivalent
straight duct length. Each fitting value must be
added to the amount of straight duct length used
to determine the overall straight duct equivalent
length. Use the following examples as a guide.
3. Using good quality ducting material, install
per these instructions. A few minutes and
pennies spent now will pay long term dividends
for the life of the cooktop.
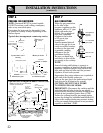
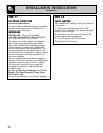
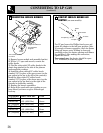
STEP 10
SHIFTING THE BLOWER FROM “LOW
RANGE” TO “HIGH RANGE”
This cooktop is equipped with a dual range
blower. It is shipped from the factory in Low
Range for most installations. If the Equivalent
Duct Length exceeds 60 feet it must be shifted
to High range. Do not shift to high range for
shorter lengths. This will cause excessive noise,
conditioned air loss and affect the flame pattern
on gas burners.
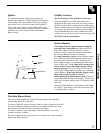
To shift to High Range,
be sure the blower is
stopped. Remove the
air grill. Remove the
filter and intake guard.
Pop the spring loaded
“restricter ring” out of
the blower inlet.
Replace the intake
guard, grill and filter.
(continued next page)