


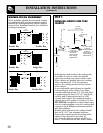
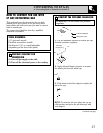
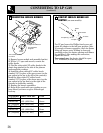
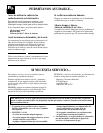

CONVERT SURFACE BURNER AIR
SHUTTER
(on some models)
For LP gas, loosen the Phillips head screw and
rotate the shutter to the full open position. After
30 seconds of burner operation, check for flames
lifting off burner ports. If lifting is observed,
gradually reduce air shutter opening until flames
are stabilized. After making the conversion,
tighten the screw.
For natural gas, the shutter should be open
1/2" or about 3/4 of the way open.
Air Opening
Air Shutter
To Close
To Open
Screw
4
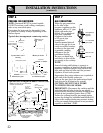
CONVER TING TO LP GAS
(continued)
CONVERTING SURFACE BURNERS
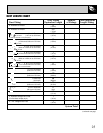
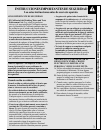
1. Remove burner module and assembly bracket.
2. With a 1/2" open end wrench, remove the
orifice hoods.
3. Find the color-coded LP orifice hoods in the
plastic bag attached to the side of the plenum
underneath the cooktop.
4. Install the silver-colored LP orifice hoods
(marked “66”) in place of the green ones (on the
gas outlets in the bay to the left of the controls).
Install the blue-colored LP orifice hoods
(marked “63”) in place of the brass ones (on the
gas outlets in the bay that is to the right of the
controls in double-bay models).
5. Replace the burner assemblies.
6. Keep all the spuds with your cooktop so you
have them if you move or get a different gas
hook-up.
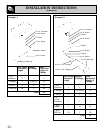
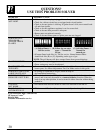
Top Burner Orifice Drill Size Color
Left Side
Natural Gas #55 (.0520 Dia.) Green
LP (Propane) #66 (.0330 Dia.) Silver
Right Side
Natural Gas #53 (.0599 Dia.) Brass
LP (Propane) #63 (.037 Dia.) Blue
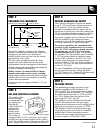
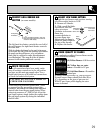
3
1/2" Open End Wrench
Turn clockwise
to tighten.
Turn counterclockwise
to remove.
Orifice
Hood
28