


– 38 –
(Continued Next Page)
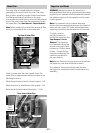
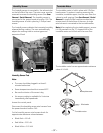
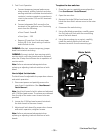
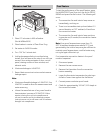
Monitor interlock
switch
Door sensing
(Secondary
Interlock)
Primary interlock
switch
Left and Right Door Switch Assemblies
The primary interlock, monitor interlock, and
door sensing (secondary interlock) switches are
mounted on plastic latch boards. The latch boards
are attached to the left and right side of the oven
cavity. The left side latch board contains the door
sensing (secondary interlock) switch. The right side
latch board contains the primary interlock and the
monitor interlock switches.
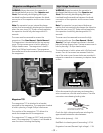
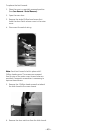
Right side Latch Board Shown
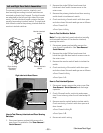
Monitor Interlock Switch
Primary Interlock Switch
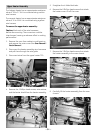
Remove the single Phillips-head screw that
holds each door switch access cover to the
outer cover.
Remove the primary interlock and door sensing
switch leads to isolate each switch.
Check continuity of each switch with door open
and door closed. Normal readings are as follows:
• Door Closed: 0 Ω
• Door Open: Infi nity
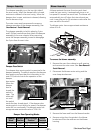
How to Test the Monitor Switch:
Note: The right side latch pawl pushes horizontally
and actuates the lever of the monitor interlock,
opening the switch.
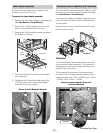
Disconnect power and partially remove the
oven from it’s installation. (See
Oven Removal /
Partial Removal.)
Remove the single Phillips-head screw that
holds the right side door switch access cover to
the outer cover.
Remove the monitor switch leads to isolate the
switch.
Check continuity of the switch with door open
and door closed. Normal readings are as follows:
• Door Closed: Infi nity
• Door Open: 0 Ω
How to Test Interlock System:
1. Disconnect power, remove the outer cover (See
Oven Removal / Partial Removal) and discharge
capacitor.
2. Check 20 amp fuse for continuity and proper
size. Do not use any other fuse or size except 20
amp.
3. Remove monitor switch leads to isolate switch.
Check continuity of switch with door open and
door closed.
• Door Closed: Infi nity Ω
• Door Open: 0 Ω
4. Reconnect switch wiring.
2.
3.
4.
1.
2.
3.
4.
How to Test Primary Interlock and Door Sensing
Switches:
Disconnect power and partially remove the
oven from it’s installation. (See
Oven Removal /
Partial Removal.)
1.