5
Note:Please check for any damage that may have occurred during shipping. In the unlikely event that you nd any
shipping damage, inform your dealer immediately!
Caution when unpacking:
Lift the range by the bottom skirt, do not lift by nickel trim.
Unpacking:
Note:toavoidinjury,pleasewearsafetyequipement,glassesandgloves,whileyouareunpackingyournewrange.
1)Unscrewthe12screwsthatholdthecrateontotheskid.Thereare12alongthebottomand4alongthetop.
2)Afterthescrewshavebeenremoved,carefullyliftthecrateoverthestoveandsetitaside.
3)Nextwithapairoftinsipscutthebandingthatholdsthestoveintoplace.Cautionmetalbandingisundertension!
4)Carefullyremovethebanding,the2boardsthatwhereunderthebandingandthecardbordcapandstyrofoam.
5)Youarenowreadytoremovetherangefromtheskid
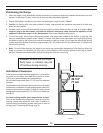
For30"unitshaveonepersonateachendstandbesidetheskidandcarefullylifttherangebythebottomskirt,anda
thirdpersonpulltheskidoutfromunderneaththerange.Slowlysettherangedownontheoor,bendingyouknee's
notyourback!
For48"unitsunitshaveonepersonateachendandoneside,standbesidetheskidandcarefullylifttherangebythe
bottomskirt,andafourthpersonpulltheskidoutfromunderneaththerange.Slowlysettherangedownontheoor,
bendingyourknee'snotyourback!
6)Finishunpackingtherangeremovingpackingtapearoundthedoorsandintheoven.
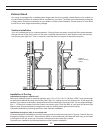
Both30"and48"Rangesconsistoftwomainparts: TheRangeBody,and
TheCloset/ExhaustHood
Tools required for assembly: -Phillips/RobertsonScrewdriver
-5/16"(8mm)wrenchorcrescentwrench
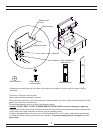
Gliders:
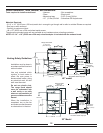
Theteonglidershouldextendbeyondthebottomofthelegbyapproximately
1/8"-1/4".Adjustinglevellingboltsintoofarwillcausethelegtodragonthe
oorpotentiallycausingdamagetoooring.(seegure1).Checkthatgliders
andoorarefreeofanydebris,thiswillensureyoudonotscratchyouroor.
Assembly and Installation
Tofullyenjoyyournewrange,itisimportantthatyoureadthisbookletthoroughly.
TeonGlider
1/8"-1/4"
Figure1
You must have a qualied electrician connect the new range to be sure all electrical codes and rules are
observed except when range is equipped with a cord and plug


