


PRO
3
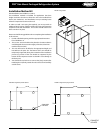
Side Mount Packaged Refrigeration System Installation and Operations Manual, May 2008 9
PRO
3
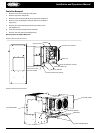
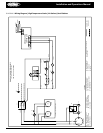
Side Mount Packaged Refrigeration System
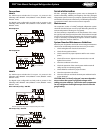
Max. & Min. Temperature Memorization
HOW TO SEE THE MIN. TEMPERATURE
1. Press and release the DOWN key.
2. The “Lo” message will be displayed followed by the minimum
temperature recorded.
3. By pressing the DOWN key again or by waiting 5 seconds the
normal display will be restored.
HOW TO SEE THE MAX. TEMPERATURE
1. Press and release the UP key.
2. The “Hi” message will be displayed followed by the maximum
temperature recorded.
3. By pressing the UP key again or by waiting 5 seconds the
normal display will be restored.
HOW TO RESET THE MAX AND MIN TEMPERATURE RECORDED
1. Hold press the SET key for more than 3 seconds, while the
max. or min temperature is displayed. (rSt message will
be displayed)
2. To conrm the operation the “rSt” message starts blinking and
the normal temperature will be displayed
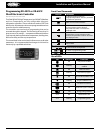
Main Functions
HOW TO SEE THE SETPOINT
1. Push and immediately release SET key: the
display will show the set point value
2. Push and immediately release the SET key or wait 5 seconds to
display the probe value again
HOW TO CHANGE THE SETPOINT
1. Push SET for more than 2 seconds to change the set-point value
2. The value of the set-point will be displayed and the °C or °F
LED starts blinking
3. To change the set value push UP or DOWN arrows within 10
seconds
4. To memorize the new set point value push SET key again or
wait 10 seconds
HOW TO START A MANUAL DEFROST
Push DEF key for more than 2 seconds and a manual
defrost will start.
HOW TO CHANGE A PARAMETER VALUE
To change a parameter value:
Enter the Programming mode by pressing the SET + DOWN
keys for 3 seconds (the °C or °F LED starts blinking)
Select the required parameter. Press SET to display its value.
Use UP or DOWN to change its value
Press SET to store the new value and move to the following
parameter
To exit: Press SET + UP or wait 15 seconds without pressing a key
NOTE: The set value is stored even when the procedure is exited by
waiting the time-out to expire.
1.
2.
3.
4.
The Hidden Menu
The hidden menu Includes all the parameters of the instrument.
HOW TO ENTER THE HIDDEN PARAMETERS
1. Enter the Programming mode by pressing the Set + DOWN
keys for 3 seconds (the °C or °F LED starts blinking).
2. Release the keys, then push again the Set+DOWN keys
for more than 7 seconds. The Pr2 label will be displayed
immediately followed from the HY parameter.
NOW YOU ARE IN THE HIDDEN MENU
3. Select the required parameter.
4. Press the SET key to display its value
5. Use UP or DOWN to change its value.
6. Press SET to store the new value and move to the following
parameter.
To exit: Press SET + UP or wait 15 seconds without pressing a key.
NOTE 1: If no parameter is present in Pr1, after 3 seconds the “noP”
message is displayed. Keep the keys pushed until the Pr2 message
is displayed.
NOTE 2: The set value is stored even when the procedure is exited
by waiting the time-out to expire.
HOW TO MOVE A PARAMETER FROM THE HIDDEN MENU TO
THE FIRST LEVEL AND VICE VERSA
Each parameter present in the HIDDEN MENU can be removed or
put into “THE FIRST LEVEL” (user level) by pressing SET + Down.
In HIDDEN MENU when a parameter is present in First Level the
decimal point is on.
HOW TO LOCK THE KEYBOARD
1. Keep the UP + DOWN keys pressed for more than 3 seconds.
2. The “POF” message will be displayed and the keyboard will be
locked. At this point it will be possible only to see the set point
or the MAX o Min temperature stored
3. If a key is pressed more than 3 seconds the “POF” message will
be displayed.
To unlock the keyboard
Keep the UP + DOWN keys pressed for more than 3 seconds, until
the “Pon” message is displayed.
The continuous cycle
When defrost is not in progress, it can be activated by holding the
UP key pressed for about 3 seconds. The compressor operates to
maintain the ccS set point for the time set through the CCt parameter.
The cycle can be terminated before the end of the set time using the
same activation key UP for 3 seconds.
The on/o function
With “onF = oFF”, pushing the ON/OFF key, the instrument is
switched o. The “OFF” message is displayed. In this conguration,
To switch the instrument on, push again the ON/OFF key.
WARNING: Loads connected to the normally closed contacts of
the relays are always supplied and under voltage, even if the
instrument is in stand by mode.