


– 8 –
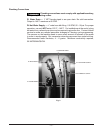
PLACING THE ROTOR IN THE OVEN
Do not wrap the rotor or any other parts inside the oven with aluminum
foil. Soft metals can react with oven cleaners, and hazardous interactions can
result.
The rotor must properly engage with the drive mechanism. Orient the rotor so that the
end plate with square drive slots is on the same side of the oven as the drive arm.
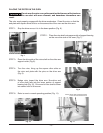
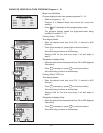
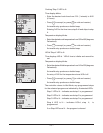
STEP 1: Stop the drive arm so it is in the down position (Fig. 6).
Fig. 6
Fig. 7
Fig. 8
Fig. 9
Fig. 11Fig. 10
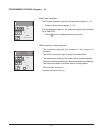
STEP 3: Place the drive side of the rotor shaft on the drive arm
support notch (Fig. 8).
STEP 4: Turn the rotor, lining up the square drive slots on
the rotor end plate with the pins on the drive arm
(Fig. 9).
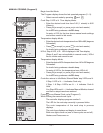
STEP 5: Nudge rotor toward the drive arm. Non-drive end
of rotor shaft falls into the lower portion of support
bearing hub (Fig. 10). Drive end of rotor shaft is driven
into center hole of drive arm.
STEP 6: Rotor is now in normal operating position (Fig. 11).
STEP 2: Place the rotor shaft onto upper notch of support bearing
on the non-drive side of the oven (Fig. 7).
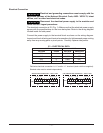
MOTOR DRIVE PINS THROUGH DRIVE
SLOTS ON ROTOR END PLATE