


14620918702
J. Reassemble the agitator assembly and disc into the hopper. Make certain the retaining screw is tight.
K. Using a mechanical spray bottle filled with sanitizing solution, spray the entire interior of the hopper
and the agitator assembly. Go to the lower auger drive area and also spray with sanitizing solution.
Allow to air dry.
L. Using the spray bottle, spray the inside of the two halves of the auger tube, the auger, the two halves
of the chute assembly, and the undersides of the right and left covers. Allow to air dry.
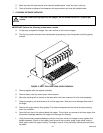
M. Reassemble the two halves of the auger tube and place back into it’s mounting. Holding the auger by
the upper shaft end, insert into the guide tube. Make certain that the auger slips into it’s drive pin. The
chute assembly will not assemble properly if the auger is not seated on it’s drive pin. Reassemble the
upper auger and chute assembly onto the auger and lock down by snapping the ball onto the upper
housing. Reinstall the tower cover with the thumb screws.
N. Reinstall the covers. Put the right cover on first before you close the left cover.
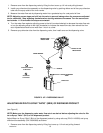
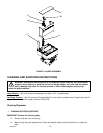
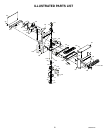
3. Last are the auger housings (Items 74 and 75). They are dislodged by pulling upward. Check their orienta-
tion and the fact that the longer tube is on the front side. When positioning the housings back in the dis-
penser, the longer tube should be placed first so as to seat in the lower housing to set up the orientation
(top and bottom are marked on end of the tube tab at the top), otherwise the ice chute spout will not point
towards the front of the dispenser.
Cleaning Dispensing Valves
Refer to addendum supplied with the unit that is applicable to the manufacturer of the valves installed
on the unit.
Sanitizing Syrup Tanks System
Only trained and qualified persons should perform these cleaning and sanitizing procedures.
Sanitize syrup tanks system as follows:
1. Remove all the quick disconnects from all the tanks. Fill a suitable pail or bucket with soap solution.
2. Submerge all disconnects (gas and liquid) in the soap solution and then clean them using a nylon bristle
brush. (Do not use a wire brush). Rinse with clean water.
3. Prepare sanitizing solution and using a mechanical spray bottle, spray the disconnects.
Allow to air dry.
4. Using a clean, empty tank, prepare five (5) gallons of the sanitizing solution. Rinse the tank disconnects
with approximately 9 oz. of the sanitizing solution. Close the tank.
5. Prepare cleaning tank by filling clean five (5) gallon tank with a mixture of mild detergent and potable water
(120_F).
6. Connect a gas disconnect to the tank and then apply one of the product tubes to the cleaning tank. Oper-
ate the appropriate valve until liquid dispensed is free of any syrup.
7. Disconnect cleaning tank and hook up sanitizing tank to syrup line and CO
2
system.
8. Energize beverage faucet until chlorine sanitizing solution is dispensed through the faucet. Flush at least
two (2) cups of liquid to ensure that the sanitizing solution has filled the entire length of the syrup tubing.
9. Allow sanitizer to remain in lines for fifteen (15) minutes.
10. Repeat the step above, applying a different product tube each time until all tubes are filled with the sanitiz-
ing solution.