


5 620918702
INSTALLATION INSTRUCTIONS
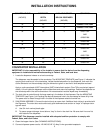
COUNTER HEIGHT
(INCHES)
DISPENSER
DEPTH
(INCHES
AVAILABLE SPACE
BELOW DISPENSER
(INCHES)
USE KIT NO.
30 29 1 CONSULT FACTORY
31 29 2 CONSULT FACTORY
32 29 3 620517502
AND
629087406
33 29 4 629087406
34 29 5 629087406
34–1/2 29 5–1/2 629087412
AND
620517502
35 29 6 629087412
36 29 7 629087412
COUNTERTOP INSTALLATION
IMPORTANT: It is the responsibility of the installer to ensure that the drains from the dispensing
equipment is installed and maintained according to Federal, State, and local laws.
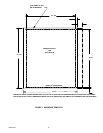
1. Locate the dispenser indoors on a level countertop.
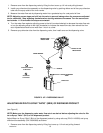
The dispenser must be sealed to the countertop. The MOUNTING TEMPLATE (see Figure 1) indicates the
opening that must be cut in the countertop. Locate the desired position for the dispenser, then mark the
outline dimension on the countertop using the dimensions given or use the full size template enclosed.
Apply a continuous bead of NSF International (NSF) listed silastic sealant (Dow 732 or equivalent) approxi-
mately 1/4 inch inside the dispenser outline dimensions and around all openings. Position the dispenser on
the countertop within the outline dimensions. All excess sealant must be wiped away immediately.
2. The drain tube is routed through the large opening in the bottom of the dispenser. See the MOUNTING
TEMPLATE (see Figure 1) for locating the required clearance hole in the countertop for these utility lines.
The power cord is routed through hole in the side of the dispenser electrical control box.
3. SINK DRAIN ASSEMBLY: Connect the drain tube to an open drain. Additional drain tubing is provided with
the Dispenser. The drain tube must continuously pitch downword and contain no “traps” or improper drain-
age will result.
A. Use 3/4–inch nominal plastic pipe.
B. To assure proper drainage, do not allow a “trap” to form in the drain line. Be sure drain line runs flat
with bottom of the dispenser.
IMPORTANT: This dispenser must be installed with adequate backflow protection to comply with
Federal, State, and Local Codes.
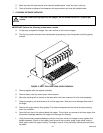
4. Clean the hopper interior (See CLEANING INSTRUCTIONS).
5. Connect dispenser power cord to 120 VAC 60 HZ 15–Amp 3–wire grounded receptacle.