


25
5. Touch START to begin cooking.
OR
6. If a programmed cook time is desired, touch TIMER NOT SET
to enter the Cook Time screen. Enter a cooking length using
the on-screen number keyboard to set a timer to alert when
cooking ends. The time length may not exceed 12:00:00. The
oven will turn off when the cook time expires.
7. (Optional) To keep food warm after a programmed cook timer
ends, turn Keep Warm ON from the Cook Time screen. See
the “Keep Warm™ Option” section for additional information.
8. (Optional) To set a delayed start, touch DELAY START from
the Cook Time screen and set desired time. A second way to
set a delay start is to touch DELAY START from the
Temperature tab. See “Delay Start” section for additional
information.
9. Touch START to begin cooking or to start the Delay Timer.
10. When the timer ends, you can start the Keep Warm cycle,
Add More Time or Cancel the timer. To add more time, touch
ADD MORE TIME or EXIT TIME then set timer. Enter desired
time and select OK.
11. Touch CANCEL (CANCEL UPPER or CANCEL LOWER on
double models) to turn off the oven.
Convect Pastry
Convect Pastry is best for 1, 2, or 3 rack baking of items such as
cream puffs, turnovers, and croissants. The recipe temperature
should not be reduced for Convect Pastry.
Before Using Convect Pastry:
Before using Convect Pastry, see the “Positioning Racks and
Bakeware” section and the following tips for rack positions.
1-rack baking: 3f
2-rack baking: 2o and 3r
3-rack baking: 1o, 3f, and 5r
NOTE: An “o” after the rack position number indicates that the
offset rack should be used. An “f” indicates that the flat rack
should be used, and an “r” indicates that the roll-out rack should
be used.
To Use Convect Pastry:
1. Touch MODES tab to move to the Modes menu.
2. From the Modes menu, touch CONVECT PASTRY.
3. After touching Convect Pastry, you will move to the
Temperature screen, or you may touch the Temperature tab
to move to the Temperature screen.
Use the slider to enter a desired cooking temperature or
touch the -5°F (-1°C) or +5°F (+1°C) buttons. The temperature
must be between 170°F (77°C) and 550ºF (288ºC).
4. Touch START to begin preheating oven.
OR
5. If a programmed cook time is desired, touch TIMER NOT SET
to enter the Cook Time screen. Enter a cooking length using
the on-screen number keyboard to set a timer to alert when
cooking ends. The time length may not exceed 12:00:00. The
oven will turn off when the cook time expires.
6. (Optional) To keep food warm after a programmed cook timer
ends, turn Keep Warm ON from the Cook Time screen. See
the “Keep Warm™ Option” section for additional information.
7. (Optional) To set a delayed start, touch DELAY START from
the Cook Time screen and set desired time. A second way to
set a delay start is to touch DELAY START from the
Temperature tab. See “Delay Start” section for additional
information.
8. Touch START to begin preheating oven.
9. Place food in oven when preheat signal sounds. The screen
will also prompt you when to insert food. If a delayed start is
programmed, place food in oven when setting the mode.
NOTE: Do not use Delay Start for items that require a preheated
oven, such as cakes, cookies, and breads. If food is in the oven
during preheat, it may become overcooked.
10. When the cook timer ends, you can start the Keep Warm
cycle if not preset, Add More time or Cancel the timer. To add
more time, touch ADD MORE TIME or EXIT TIME then set
timer. Enter desired time and select OK.
11. Touch CANCEL (CANCEL UPPER or CANCEL LOWER on
double models) to turn off the oven.
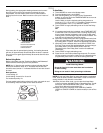
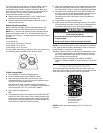
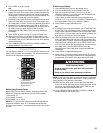
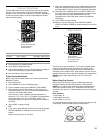
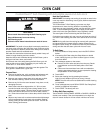
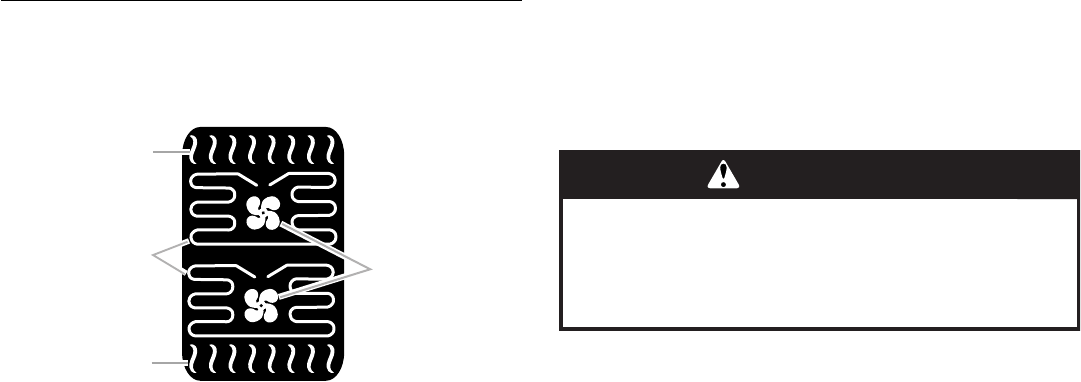
A.Broil element
B.Convection elements
C.Convection fans
D.Bake element
A
B
C
D
WARNING
Food Poisoning Hazard
Do not let food sit in oven more than one hour before
or after cooking.
Doing so can result in food poisoning or sickness.