


24
=
=
31
30
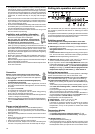
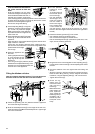
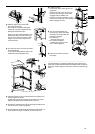
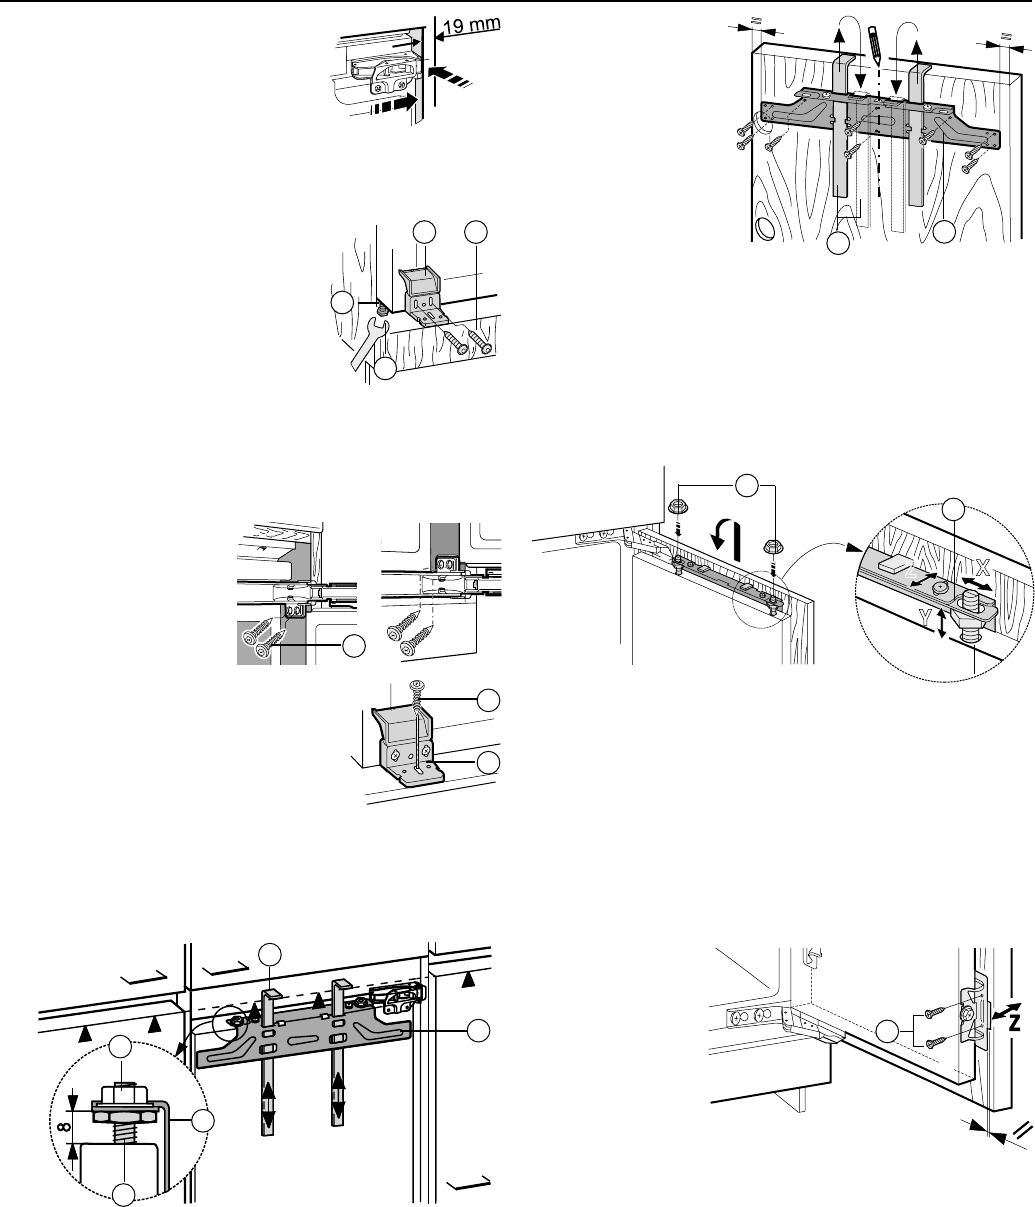
W Fit the fastener
traverse dm to the
unit door:
- To do this screw off
the traverse above
the lock nuts dn .
- Use the assembly
devices dl to sus-
pend the traverse
onto the inside of
the unit door align it
to the centre (draw
a short centre line
onto the unit door, bring the tip of the arrowon to it, the dis-
tances to the outer edge must be the same to the right and to
the left).
W Fasten the fastening traverse dm in the centre:
- use at least 6 screws for chipboard doors,
- use 4 screws at the edges on cassette doors.
- Pull the assembly devices dl upwards and push them, at an
angle, into the receiving apertures.
W Hinge the unit door onto the appliance door/adjusting pins do,
loosely screw on the lock nuts dn onto the adjusting bolts. Close
the door.
W Check the distance of the door against the surrounding unit
doors.
- Align the unit door to be flush with the surrounding unit doors:
Even the sides X by pushing, and the height Y and lateral
inclination, using the adjusting bolts do - with a screw driver.
- Tighten the lock nuts dn .
W Screw the ap-
pliance door dp
onto the unit door
with the fixing
bracket em:
- Make sure the two
metal edges are
flush, symbol //.
Then predrill the
fastening holes (if
necessary use a
braddle to punch
holes)and screw
firmly.
X
Y
Z
31
32
41
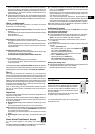
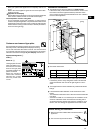
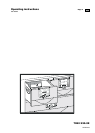
If the unit walls are 19 mm thick=
the niche should be 562 mm
wide:
- Push the appliance into the niche
until the front edges of the hinges are
flush with the side walls of the unit, on
unitswith door stopper components
(burls, sealing lips etc.) please pay attention to the dimensions
of these! Allow the hinges to protrude by the amount of their
dimension. Push the appliance against
the unit wall, hinge-side facing.
W Use the adjusting feet cq to align the
appliance, using the wrench supplied
cr so that it is positioned upright.
Make sure the body of the appliance
is parallel with the front edges of the
sides of the unit.
W Screw the plastic bracket cs using M5
screws ct on the handle side of the
appliance.
- Align the bottom of the plastic bracket cs flush with the front
edge of the floor of the unit.
If there are door stopper elements (burls, sealing lips etc.)
take account of the dimensions of these and align them to be
parallel with the front edge
of the hinge.
W Screw the appliance into
the niche .
- Use long chipboard screws
to screw through the cu
hinge lugs at the top and
the bottom.
- Use a long screw cu to prefit the central
slotted hole on the plastic bracket cs . Fold
back the cover on the plastic bracket, and
close the door of the appliance.
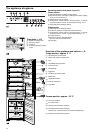
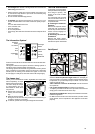
Fitting the kitchen unit door
Note: You need the assembly devices dl for both doors. You
therefore need to fit the unit doors one after another.
W Check the presetting of 8 mm (distance between appliance
door and lower edge of traverse).
W Push the assembly devices dl to the height of the unit door,
lower edge of the stop ▲ on the assembly device = upper edge
of the door to be fitted.
25
26
27
28
29
29
27
30
31
31
33
32