


The numbers indicate the storage time in months for differ-
ent types of frozen foods. The storage times given are
guidelines.
5.8.9 IceMaker*
The IceMaker is in the top drawer of the freezer compart-
ment. The drawer is labeled "IceMaker".
Make sure that the following conditions are fulfilled:
–
The appliance is level.
–
The appliance is connected to the electricity supply.
–
The freezer compartment is switched on.
–
The minimum freezer temperature is 14 °F (-10 °C).
–
The IceMaker is connected to the water supply.
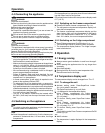
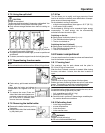
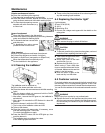
Switching on the IceMaker*
Fig. 6
u
Pull out the drawer.
u
Press On/Off button
Fig. 6 (1)
so that the LED
Fig. 6 (2)
lights up.
u
Push in the drawer.
Note
u
The IceMaker only produces ice cubes when the drawer
is completely closed.
Switching off the IceMaker*
If ice cubes are not required, the IceMaker can be switched
off independently of the freezer compartment.
When the IceMaker is not in operation, clean the IceMaker.
This ensures that no water or ice remains in the IceMaker.
When the IceMaker is switched off, the drawer of the Ice-
Maker can also be used for freezing and storing food.
u
Press the On/Off button for about 1 second until the LED
goes out.
Producing ice cubes*
The production capacity depends on the freezer tempera-
ture. The lower the temperature, the more ice cubes can be
produced in a certain period.
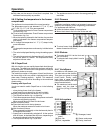
The ice cubes fall out of the IceMaker into the drawer. When
the ice cubes reach a certain height in the drawer, no more
ice cubes can be produced.
If large quantities of ice cubes are required, the complete
IceMaker drawer can be swapped with the neighboring
drawer. When you close the drawer, the IceMaker auto-
matically restarts production.
When the IceMaker is switched on for the first time, it may
take up to 24 hours for the first ice cubes to be produced.
Note
u
Do not consume or use the first three batches of ice
cubes. This applies both to using the appliance for the
first time and using it when it has not been used for a long
time. This ensures that the water pipe is rinsed through.
6 Maintenance
6.1 Defrosting with NoFrost
The NoFrost system defrosts the appliance automatically.
Fridge compartment:
The defrosted water is evaporated by the heat of the com-
pressor. Drops of water on the back wall are a functional
feature and completely normal.
u
Clean the drain opening regularly so that the defrosted
water can flow away. (see Cleaning section).
Freezer compartment:
The moisture condenses on the evaporator and is periodi-
cally defrosted and evaporated.
u
The appliance does not have to be defrosted manually.
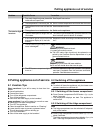
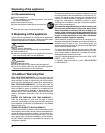
6.2 Cleaning the appliance
Before cleaning:
WARNING
Danger of electric shock.
u
First, remove the plug or switch off the fuse.
CAUTION
Risk of injury or damage due to hot steam.
Hot steam can damage the surfaces and cause burns.
u
Do not use steam cleaners.
NOTICE
Incorrect cleaning damages the appliance.
u
Do not use concentrated cleaning agents.
u
Do not use steel wool or sponges that scour or scratch.
u
Do not use cleaning agents containing sand, chloride,
chemicals or acids.
u
Do not use chemical solvents.
u
Do not damage or remove the rating plate on the inside
of the appliance. It is vital for the customer service de-
partment.
u
Do not pull off, kink or damage any cables or other com-
ponents.
u
Do not let cleaning water get into the drain gutter, the
ventilation grille and electrical parts.
u
Empty the appliance.
– Use soft cleaning cloths and a multi-purpose
cleaning agent with a neutral pH value.
– Only use food-compatible cleaning and care
agents inside the appliance.
Maintenance
11