


3
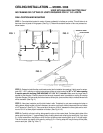
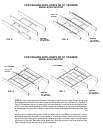
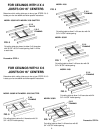
CEILING INSTALLATION — MODEL 3038
USED WITH AN A3024 SHUTTER ONLY
NO FRAMING OR CUTTING OF JOISTS REQUIRED FOR 16” O.C. JOISTS.
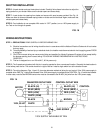
FAN LOCATION AND MOUNTING
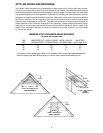
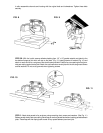
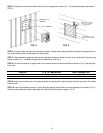
STEP 1 - Fan should be located in center of house, preferably in hallway or corridor. This will allow air to
be drawn from all parts of living space. (See Fig. 1). Determine tentative location of fan and proceed as
shown below.
FIG. 1
FIG. 2
FIG. 3
FAN
OVERLAP AREA
PILOT HOLES
18” MIN.
CLEARANCE
R
O
O
F R
AFTE
R
S
STEP 2 - Determine joist direction and locate center joist in tentative fan opening. Lightly pencil a rectan-
gular 30
1
⁄2” x 33
1
⁄2” opening on ceiling below where shutter is to be located, or 30
1
⁄2” x 34” when opening
is used to pass fan housing (FAN HOUSING 34” X 34” X 6”) into attic. Make sure the longer side is
parallel to joist direction. Check to be sure that enough clearance area is available on ceiling for overlap
of shutter flanges. Drill two small pilot holes close to center joist, (one on either side) to indicate where hole
will be centered. (See Fig. 2.)
STEP 3 - Now clear insulation and find pilot holes in attic. Tentatively lay out same rectangular holes on
ceiling below. Adjust location of hole if necessary to ensure a minimum vertical clearance from roof rafters
of 18” above fan. (See Fig. 3.) There must be a minimum of 301/4” between the three joists and a maxi-
mum of 311/4” to allow proper installation of shutter. (See Fig. 4 & 5.)
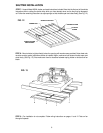
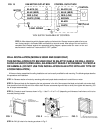
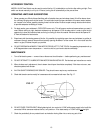
STEP 4 - Carefully cut hole in ceiling, being careful not to cut into center joists. Cut along both sides of the
center joist, leaving the 1
1
⁄2” (approximately) strip of ceiling sheet rock covering the center joist. If you have
2 x 4 joist construction, the joists on which the fan will be mounted must be built up to 2 x 6 joist height.
This can be done very easily at this point by nailing (3) 2 x 2 furring strips 40” long to the top of the joists,
one on each joist. (See Fig. 4 thru 7.)