


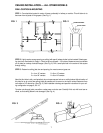

4
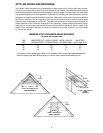
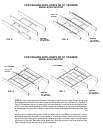
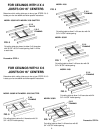
FOR CEILINGS WITH JOISTS ON 16” CENTERS
MODEL A3024 SHUTTER
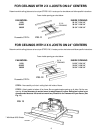
FOR CEILINGS WITH JOISTS ON 24” CENTERS
MODEL A3024 SHUTTER
FIG. 4 FIG. 5
FIG. 6
FIG. 7
EXISTING
2 X 6 JOISTS
(DO NOT CUT!)
EXISTING
2 X 4 JOISTS
(DO NOT CUT!)
EXISTING
2 X 6 JOISTS
(DO NOT CUT!)
EXISTING
2 X 4 JOISTS
(DO NOT CUT!)
2 X 2 X 40
FILLERS
2 X 6 FRAMING
2 X 6 FRAMING
2 X 2 X 40
FILLER
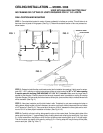
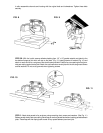
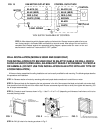
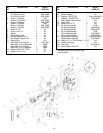
STEP 5A - If the access opening into the attic is not large enough for the fan to pass through, the fan may
be disassembled and lifted into the attic through the shutter hole which has just been cut. (See Step 2,
Page 3.) Disassemble the fan by removing the four bolts holding the channels to the housing as shown
in Fig. 8. The motor-blade assembly should be handled very carefully so as not to bend the fan blade. It
is not necessary to remove the fan blade in order to lift the motor-blade assembly between the joists. (See
Fig. 9.)
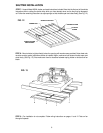
However, for an installer working alone, handling the parts will be more difficult, and therefore it may be
desirable to remove the fan blade to prevent damage. To remove the blade, loosen the two set screws in
the hub and slip the blade off. To reassemble the blade once the fan is in the attic, align the two set screws
with the flat on the shaft. Make sure the fan blade hub is flush with the end of the motor shaft and then
tighten both set screws securely (150 in-lbs recommended).