


7
CEILING INSTALLATION — ALL OTHER MODELS
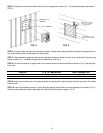
FAN LOCATION & MOUNTING
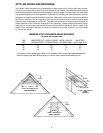
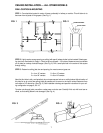
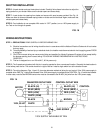
STEP 1 - Fan should be located in center of house, preferably in hallway or corridor. This will allow air to
be drawn from all parts of living space. (See Fig. 1.)
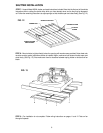
STEP 2 - Lightly mark a square opening on ceiling (with pencil) where shutter is to be located. Select open-
ing size from chart below on Page 1. Check to be sure at least 1 1/2 inches of clearance area is available
on all sides for overlap of shutter flanges. (See Fig. 2.) Drill a small pilot hole in the center of this square
through ceiling.
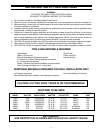
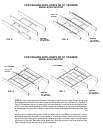
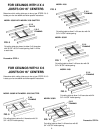
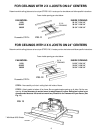
STEP 3 - Determine ceiling joist size and spacing; the most common types are:
2 x 4 on 16” centers 2 x 6 on 16” centers
2 x 4 on 24” centers 2 x 6 on 24” centers
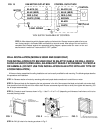
Now find pilot hole in attic, and tentatively lay out same square hole as on ceiling below. Adjust location of
this hole so as to cut as few ceiling joists as possible and to ensure a minimum vertical clearance from
roof rafters of 18” above fan. (See Fig. 3.) See installation drawings and specific instructions for your ceil-
ing configuration on page 8, 9 & 10.
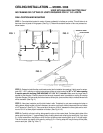
To make cuts through joists, use either a saber saw or circular saw. Carefully finish cut with hand saw or
chisel, so that ceiling below is not damaged. (See Fig. 4.)
FIG. 1
FIG. 2
FIG. 3 FIG. 4
FAN
OVERLAP AREA
PILOT HOLE
18” MIN.
CLEARANCE
R
O
O
F R
AFTER
S