


141
SECTION 3 - SERVICING COMPONENTS
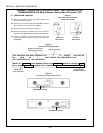
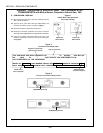
5. Checking the Heating Elements
The most common problems encountered with electric
heaters are:
Open or bad connections.
Open, shorted or grounded heating elements.
To troubleshoot the heating elements, disconnect all
leads at the back wall and check each element with a
digital multimeter set to Ohms (W). Correct ratings are
shown in the table in the preceding section. Zero read-
ing on the ohm scale indicates an open or shorted ele-
ment.
4. Heater specifications
PS200-series electric ovens use six individual heat-
ing elements.
208V elements are used for ovens with a 208V
supply.
240 volt elements are used for ovens with a 220, 230
or 240V supply. 240V elements are also used on
ovens with a 416V or 480V supply (connected in se-
ries).
380V elements are used for ovens with a 380V
supply.
All heaters are connected in Delta.
Each heating element is stainless clad and has a
3/76mm cold (unheated) end next to the connect-
ing leg.
Individual element electrical data
Volts Watts Ohms Connection
208V 4500W 9.6W Parallel
220V 3781W 12.8W Parallel
230V 4133W 12.8W Parallel
240V 4500W 12.8W Parallel
380V 4500W 32.2W Parallel
416V 3380W 12.8W Series
480V 4500W 12.8W Series
It is also possible to check for an open element using
an ampmeter. Any current through the element indi-
cates that the element is not open.
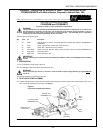
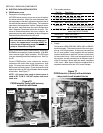
6. Changing Heating Elements
NOTE: Wires going from the mercury contactor (or
solid state relays, as appropriate) to the heating ele-
ments are rated at #12 gauge TAGT, 482°F/250°C. DO
NOT, under
any circumstances, use a wire of lesser
rating or quality.
NOTE: All lugs and connections are rated at 600°F/
316°C. All heating element connections are double-
nutted.
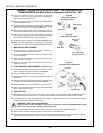
To remove the element:
Remove the blower belt.
Remove the 12 electrical lead connections to the
heaters at the back wall.
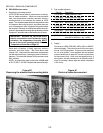
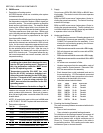
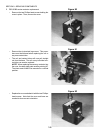
Remove the 12 bolts that hold the rear oven panel
to the body. Once removed, DO NOT lay the panel
on either its front or back side. This can damage
the heating elements and blower fan. The panel
should be kept upright as shown in Figure 78.
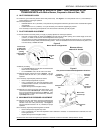
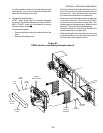
Remove the fan shroud.
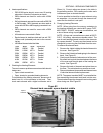
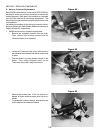
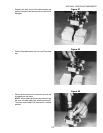
Remove the screws at both ends of the element
and pull the element straight out. See Figure 79.
When replacing the rear oven panel, be sure to use
a high-temperature never-seize lubricant on the 12
bolts that hold the panel in place.
Figure 78
Fan shroud removed
Figure 79
Removing elements
Mounting
screws