


INSTALLATION & OPERATIONAL SELV MANUAL
27 L20-406 Rev 5 (3/14)
WARNING
Serious injury could result from direct contact with hot surfaces and/or oil. Always wear apron,
heat resistant gloves for skin protection and goggles for eye protection
WARNING
Read the operation section of this manual prior to filling or operating the appliance.
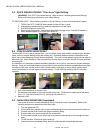
9.3 FILTERCLEANING(IfEquipped)
1. Unscrew filter strainer cap from pickup tube and gently tap it to dislodge any crumbs from the
slots. Use a clean cloth to remove any remaining crumbs and reattach.
2. Scrape all loose debris and crumbs from filter pickup assembly and filter pan with the filter
scoop shovel.
3. Remove filter pickup and place in pot sink, power soak sink or dishwasher for cleaning. Be sure
to rinse thoroughly and dry all surfaces before re-assembly.
4. Wipe the filter pan with clean damp cloth and a food grade detergent. If necessary place pan in
pot sink to rinse all the detergent from the surfaces and dry all surfaces before re-assembly.
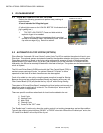
10 WEEKLYPREVENTATIVEMAINTENANCE
Performing the preventative maintenance steps above on a daily basis will keep your equipment clean
and safe. On a weekly basis these additional steps should be performed.
1. Turn the fryer off. Allow the oil to cool to before pulling the fryer away from the hood. Hint: This
maintenance may be ideal to perform on the day the oil is being changed so no oil is present in the
tank or filter.
2. Disconnect the power cord(s), gas hose, and retention lanyard.
3. Wearing your personal protective equipment, pull the fryer away from the hood.
4. Check that vent hood drip cup is empty and not dripping oil into the flue.
5. Check that the hood baffles are clean and not dripping oil into the flue.
6. Clean the fryer sides, back and the flue area, it may be necessary to use a non-abrasive pad to
scour and a putty knife to scrape the oil buildup. With a clean damp cloth and food grade detergent
wipe the area clean.
7. Wipe up any excessive oil on the power cord(s) and gas hose with a dry cloth.
8. Check flue pipe for any foreign debris/object and remove if found.
9. Reattach power cord(s), gas hose, retention lanyard and push fryer back under the hood
10. Check that wires and cords are not frayed or loose in and out of the cabinet.
11. Check around the appliance for loose parts or accessories that need to be secured or other foreign
items (ex: Aerosol cans) that should be removed from the area.