


INSTALLATION & OPERATIONAL SELV MANUAL
28 L20-406 Rev 5 (3/14)
11 MONTHLYPREVENTATIVEMAINTENANCE
Food debris and oil/shortening can buildup inside the tank. Performing the monthly preventative
maintenance steps below will keep your equipment safe and at peak performance. If you are producing
high quantities of fried food and/or frying heavily battered food, it may be necessary to clean these
components more than once a month.
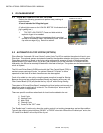
11.1 BOILOUTPROCEDURE
Wear protective gloves and clothing when cleaning and draining the appliance. Oil may spatter and
will cause injury to personnel.
1. Read the “operation” section of this manual prior to filling or operating the appliance.
2. Turn the appliance off. Drain all the oil from the tank and allow the tank to cool. The container
must also be able to withstand 400F (205C) temperatures.
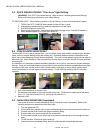
3. Remove baskets, tank rack and basket hanger for cleaning.
4. Remove and discard any large debris inside the tank.
5. Close the drain valve and fill the tank with potable water to the “oil level” line.
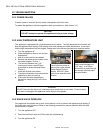
6. Place the appliance into boil mode:
Turn the appliance ON. The controller will recognize that there is water in the tank and
automatically enter boil mode. To enter boil mode manually, press the Temp Key then keys 2,
1, 2 for degrees F or 1, 0, 0. for degrees C.
7. Once the water reaches a simmer, add 8 to10 ozs (227 to 283 g) of Pitco cleaner for every 25
lbs (11.3 kgs) of oil/shortening your fryer is rated to hold.
8. Simmer for 1 minute. (The water should never be allowed to boil as this may splash over the
tank side and cause permanent damage to the components.)
9. Turn the appliance OFF and allow the fryer to soak for 15 to 30 minutes, allowing the cleaner to
soften the oil/shortening deposits and carbon.
10. Scrub the inside of the tank using a cleaning brush safe for hot water. Care must be taken to
remove all the foreign material on the tank, heating tubes, sidewalls and other components in
the tank.
11. Drain and dispose of the cleaning solution. CAUTION: Cleaning Solution is HOT.
12. Once the tank has cooled, rinse with clean potable water thoroughly.
13. Remove all remaining water and residue with a clean dry cloth.
14. Clean and dry baskets, tube rack and basket hanger before reinstalling
15. Close the drain valve and fill the cooker tank with oil.