


7
❖ Itisnotnecessaryfortheliquidoncannedmeatstocongeal.Theliquidwillcongealonlywhenthereisalargeamountofgelatin
from cartilage or connective tissue present.
❖ The loss of color from beets, during canning, is usually due to the variety of beets used or beets that are too old. If possible, can
young, tender, very dark beets which are freshly gathered. Precook beets with 2 inches of the stem and all of the root on, as this helps
to retain the juices.
❖ Discoloration of peaches and pears on the top of the jar is often due to enzyme activity which means that the processing time was not
long enough or the temperature not high enough to render enzymes inactive.
❖ Fruitwhichhasbeencannedwithoutsugarwilloftenturnbrownwhenexposedtoairjustasfreshfruitdoes.
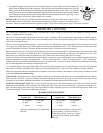
❖ ThediameterofMasonjarsmayvaryfromonemanufacturertoanother.BeforellingMasonjars,testloadyourcanner.Itmaybe
necessarytodouble-deckpintand½pintjarstoreachthemaximumcapacityofyourcannerasshowninthechartonpage4.Itis
recommended that you stagger the jars by placing one jar on top of two. Jars may touch. The canning rack which accompanied your
Pressure Canner must be placed on the bottom of the canner to prevent jar breakage. Although it is not necessary to use a rack between
layers of jars, if you wish to do so, a rack can be ordered from the Presto Consumer Service Department. See page 32 for address.
CARE AND MAINTENANCE
1. The outside surface may be kept bright and shiny by cleaning with a good silver polish or simply by washing with soap and water.
Iron and various minerals in water and foods may darken the inside of the canner, but this discoloration will in no way affect food
cooked.Thesestainsmayberemovedbyusingasolutionofwaterandcreamoftartar.Foreachquartofwater,useonetablespoon
creamoftartar.Pourenoughsolutionintothecannertocoverthediscoloration(donotllover⅔
full),thenclosecoversecurely.
Place regulator on vent pipe and heat until 15 pounds pressure is reached. Remove canner from heat; allow canner to stand two to
three hours. Remove regulator, open canner, and empty contents. Scour thoroughly with a soap impregnated steel wool cleaning
pad; wash, rinse, and dry.
Due to the acidic nature of the water supply in some areas, deterioration of the interior surface of the canner body may occur. To
minimize this effect, thoroughly scour the inside of the canner body with an abrasive cleanser at least once a year.
2. Each time the canner is washed, remove the sealing ring and wash in warm, sudsy water, rinse, dry, and replace in cover.
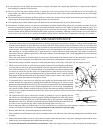
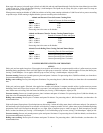
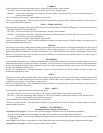
3. The air vent/cover lock may be removed for occasional cleaning or for replacing the small gasket.
To remove the air vent/cover lock, grasp and hold secure the cup portion on the underside of the
coverwithyourngers(Fig.M).Usingthengersofyourotherhand,turnthepinportionofthe
air vent/cover lock on the top side of the cover counterclockwise until the pin is free of the cup
portion. Lift the pin out of the cover and remove the cup from under the cover. Carefully pull the
small gasket off the threaded shaft on the cup portion. Wash all parts in warm, sudsy water. Use
a soft cloth or small nylon brush to clean the cover hole.
4. To reassemble the air vent/cover lock, place the small gasket over the threaded shaft of the cup
portion. Reinsert the cup portion by pushing the threaded shaft through the air vent/cover lock
openingfromtheundersideofthecover(Fig.M).Screwthepinportionclockwiseontothethreaded
shaftuntilitisngertight.Donotuseawrenchtotightentheairvent/coverlock.Overtightening
may cause the rubber gasket to wrinkle which will result in the canner not sealing. When the air
vent/coverlockisproperlyinstalled,theword(TOP)willbevisibleontheairvent/coverlockwhenviewingtheoutsideofthecover
(seeFig.J,page5).
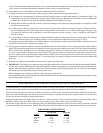
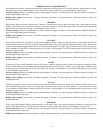
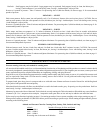
5. The overpressure plug can be removed for cleaning by pushing it out of its opening from the
top of the cover. After cleaning, reinsert the plug by pushing the domed side of the plug into the
opening from the underside of the cover, until the bottom edge is fully and evenly seated against
theundersideofthecover.Whentheoverpressureplugisproperlyinstalled,theword(TOP)will
bevisibleontheoverpressureplugwhenviewingtheoutsideofthecover(Fig.N).
Iftheoverpressureplugiseverforcedoutofitscoveropeningduetoexcesspressurewhilecookingorcanning,itisimportantto
call the Test Kitchen at 1-800-368-2194. Do not attempt to use the released overpressure plug.
6. Pouring water into a dry overheated canner may crack the metal.
7. Do not strike the rim of the canner body with any cooking utensil as this will cause nicks which may damage the rim and allow steam
to escape.
8. When your pressure canner is not in use, invert the cover on the canner body and store in a dry place. Storing the canner with the cover
locked on may cause unpleasant odors and deform the sealing ring.
9. To ensure safe operation and satisfactory performance, replace the overpressure plug every time you replace the sealing ring or
Pin
Cover
Small
Gasket
Cup
Fig. M
Threaded
shaft
Overpressure
Plug
Indented Portion
Cover
Top
Fig. N