


32
WARNING - SERVICING TO BE CARRIED OUT ONLY BY AN AUTHORISED PERSON
Disconnect from electricity and gas before servicing. Check appliance is safe when you have finished.
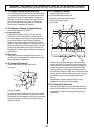
16. To Remove an Oven Burner
Open oven door and remove oven furniture. Remove
securing screw at the right hand end. The burner is
held in place by dimples in the mounting bracket. Slide
the burner to the left and lift up taking care not to
disturb the fl ame supervision device probe position .
Reassemble in reverse order. Check the fl ame
supervision device probe has not been disturbed.
17. To Change Oven Burner Assembly
Open oven door. Disconnect the tube nut and tubing.
Remove screw holding the oven burner assembly and
withdraw complete assembly. Remove oven burner
Fit oven burner to new assembly. Replace complete
assembly in the oven. Reconnect tube nut.
Check appliance is gas sound. Check correct fl ame
supervision device operation
18. To Change Oven Burner Injector
The jet is fi xed to the oven burner. Change the oven
burner assembly - see 17.
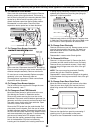
19. To Change an Oven FSD/Solenoid
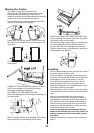
Move the cooker forward to gain access to the rear.
See ‘Moving the Cooker’ in installation section.
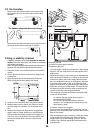
Remove the screws securing the cover box to the
backsheet. Disconnect solenoid leads at generator (or
generator and inline connector) and remove earth lead
from earth screw. Unclip wires from cable ties. Open
oven door, remove oven furniture.
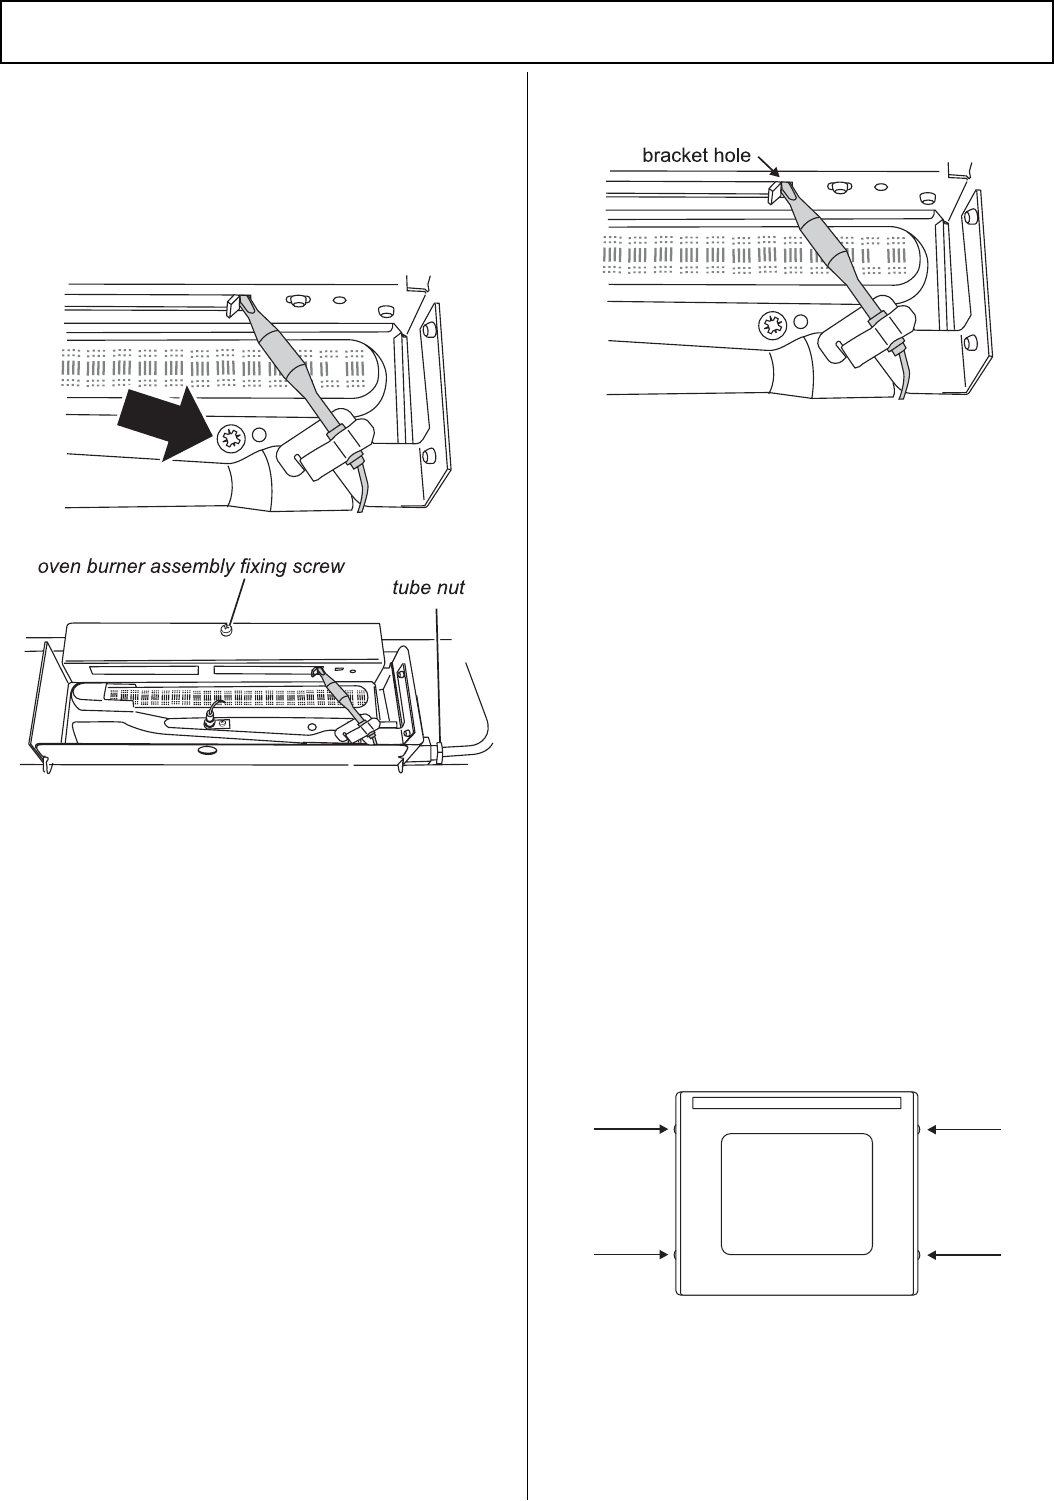
Remove the FSD probe from the probe bracket. Pull
probe clear from the bracket. From the rear of cooker
carefully withdraw capillary. Disconnect the tubes from
the FSD inlet and outlet. Remove FSD adaptor locknut
and remove assembly from bracket. Fit new assembly
and secure to bracket with FSD adaptor locknut.
Ensure that the capillary passes through clearance
hole in the backsheet. Fit probe into bracket by
inserting end into bracket hole. Locating small ferule
in spring clip by positioning it below the clip and lifting
upwards at the same time as prising the spring clip
open until it clips into position.
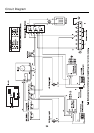
Replace leads (refer to wiring diagram). Replace wires
in cable ties. Check appliance is gas sound. Refi t cover
box. Check for correct operation of solenoid/FSD.
20. To Change Oven Electrode
Remove oven burner (see 16). Remove screw and nut
securing the electrode to the burner. Pull lead from
back of electrode and fi t to new electrode. Fit new
electrode to burner.
Reassemble in reverse order. Check ignition.
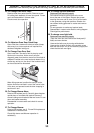
21. To Remove Grill Door
Remove L H side panel (see 3). Remove the plinth
(4 screws) and the central vertical cover (5 screws).
Remove the two countersunk screws (1 each side)
securing the grill hinge arms to the front of the grill
chamber.
NOTE: The arms are spring tensioned. Carefully
remove the grill door. Retain the gaskets.
Reassemble in reverse order ensuring that the gasket
is fi tted between the hinge arm and the front of the grill
chamber.
22. To Change Oven Door Outer Panel
Move the cooker forward to gain access to the sides.
Open the oven door slightly and remove the front
panel fi xing screws from the door sides (two each
side).
Carefully lift off the outer door panel.
Remove door handle from panel by unscrewing 2
retaining nuts. Fit door handle to new panel
Fit panel to door. Reassemble in reverse order.