


5
BEFORE YOU BAKE
REFER TO USE AND CARE GUIDE FOR DETAILED INSTRUCTIONS
CHECK THE PARTS
TAKE HEED
CHOOSE A SETTING
DELAYED FINISH
CLEANING YOUR BREAD BOX™
Get familiar with machine.
• Read the use and care guide carefully.
• Examine the removable parts . . . the bread pan
and kneading blade.
• Return these parts to the machine to get the
feel of how they fit securely into position.
The Bread Box™ is a completely computerized
appliance that proceeds automatically once you
press the right pads on the control panel.
Here’s how it works :
• Remove bread pan from machine, making sure
kneading blade is in position. Add ingredients to
bread pan as directed in recipe.
• Return bread pan to the machine, pressing until
it clicks in place.
• Close outer lid.
• Plug in machine. The display panel will show
0:00.
• Press the SELECT pad to find the desired
BAKE or DOUGH setting. The setting selected
will appear in the display window.
• Press STA RT. The machine will begin the
selected setting. WHOLE WHEAT s e t t i n g s
begin with a preheat period. All other settings
begin with a “knead” period.
• At the series of 3 “beeps,” the bread or dough is
completed.
• Press top for more than two seconds.
• Unplug machine.
• If machine is not turned off, the keep warm
f u n c t i o n will automatically turn on after the bake
cycle. It will remain on for up to 60 minutes.
• When removing bread, invert the bread pan
using hot pads or mitts. Shake loaf from pan.
For dough, simply remove by hand and proceed
as recipe instructs.
• Cool bread on wire rack.
• After bread is cool, remove kneading blade if it
is embedded in bread. See use and care guide.
There are a few precautions that should be
f o l l o w e d while using the Bread Box™. See use
and care guide.
• Unplug and wipe out the interior of the machine
with a damp cloth after each use. Wipe the
removable parts and rinse thoroughly to remove
any remaining detergent which can have an
adverse effect on the yeast.
• Do not use strong detergents or wash in dish-
w a s h e r. Warm water is usually all that is needed
to clean the bread pan and kneading blade.
• Do not immerse the bread pan in water. Instead,
fill the pan with warm water to “unstick” any
cooked-on dough.
• Do not use any cleansers, scratchy pads, or
anything that could scratch the surface of the
bread pan or kneading blade.
The Bread Box™ can perform the following
f u n c t i o n s simply by pressing various pads on the
control panel.
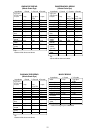
• BAKE settings - There are eight BAKE settings.
To make a loaf of bread from start to finish,
press the SELECT pad until the desired BAKE
setting number appears in the display window.
(Example: 1 for Basic Light, 2 for Basic Medium,
etc.) For best results use the program number
(1, 2 or 3) suggested for the specific recipe. If
you desire a different crust color you can
change the program number. Generally
Program number 1 is a light color, number 2 is
a medium crust and number 3 is darkest.
When changing from the suggested program you
may find different results such as a diff e r e n t
t e x t u r e crust, or a different shape on the top of
the loaf, etc. This is a result of different times in
each of the various stages of breadmaking from
Program to Program.
• DOUGH setting - Press the SELECT pad until
the DOUGH setting (the number 9 appears in
the display window.)
• If you make a mistake in selecting a setting,
press STOP for 2 seconds. This will clear the
display window. Press SELECTagain to find the
setting you desire.
Now you can make a loaf of bread or start the
dough for dinner rolls without even being home.
The Bread Box™ has a Delayed Finish feature
that will automatically start the BAKE or DOUGH
setting you have selected.
You can choose from the BASIC, WHOLE
WHEAT, FRENCH or SWEET BAKE or DOUGH
settings when using this feature. Just select
which setting you wish to use. Now, calculate the
number of hours between the present time and
the time when you wish to have the bread
f i n i s h e d or the dough ready to be removed and
shaped. The maximum amount of time that can
be programmed is 12 hours.
If may be necessary to reduce the amount of
l i q u i d in some recipes when using the delayed
timer. For some one-pound loaf recipes, reduce
liquid 1-2 teaspoons, one and one-half pound
recipes 1 tablespoon and two-pound loaf recipes
1-2 tablespoons.
The order in which ingredients are added to the
bread pan for Delayed Finish is critical. Liquids
must be added first, followed by oil and dry ingre-
dients. Yeast should be added last. For best
b a k i n g results, pile dry ingredients along one wall
of bread pan with yeast on top. This keeps the
yeast farthest from the liquid ingredients and
helps to delay activation. For delay finish
DOUGH setting, remember to remove the dough
as soon as the cycle is complete, shape and bake
according to the recipe being used.