


Installation
STEP 4: PREPARE THE WALL AND UPPER CABINET FOR INSTALLATION
I CAUTION i
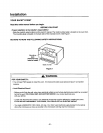
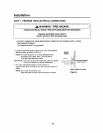
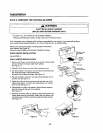
Beforeyou begin installingthe oven, PLACE A PIECE OF THE
CARTON OR OTHER HEAVY MATERIAL (a blanket) over the
countertop or cooktopto protect it. Do not use a plastic cover.
Failure to protect these surfaces could resultin propertydamage,
BEFORE YOU START
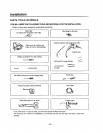
1, Remove any shipping materials and parts from inside the microwave
oven.
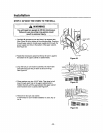
2. Cover the countertop or cooktop witha thick, protective coveringto
protect it from damage and dirt.
See Figure 20.
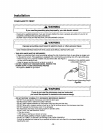
NOTE: If you have a free-standing range, disconnect it,move itonto
a piece ofcardboard or hardboardand pullit away from the
wall, so that you can get closerto the upper cabinet and beck
wall for easier measuring and drilling. Becareful notto pinch
Athick,protectiveB
covering
Figure 201-1
or damage the cord when you push the range back.
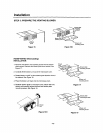
MEASURE AND TACK / TAPE UP THE
TEMPLATES
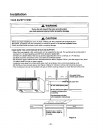
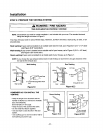
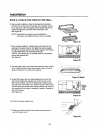
1. Usinga plumb line and (metal) measuring tape, find and mark the
vertical center line on the back wall, as in Figure 21.
2. Find and mark one or two points where the studs are on the wall.
(Studs are normally 16 inches apart)
Then measure and mark the stud locations within the
area marked H on the wall template.
Ifyou cannot find any wall stud, consult a local building contractor.
I CAUTION I
DO NOT ATTEMPT TO INSTALL THE MICROWAVE
OVEN IF YOU CANNOT FIND AWALL STUD,
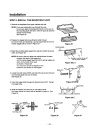
3, Line up the plumb line on the wall withthe center lineon the wall
template.
NOTE: Be sure the minimum widthis 30 inches andthe distance
from the top of the wall template to the range or counter top
is at least 30 inches.
See Figure 21.
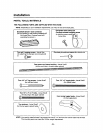
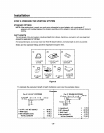
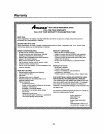
4. Securely tape or tack the wall template to the wall.
See Figure 22.
NOTE: Ifthe cabinets are not plumb, adjust the wall template to the
cabinets.
Remember, the oven must hang level.
If the front edge of the cabinet is lower than the back edge,
adjust the wall template to be level with the cabinet front.
5. Measure the bottom of the upper cabinet frame. Trim the edges
A, B and C on the upper cabinet template so that the template will fit
on the bottom of the upper cabinet. If upper cabinet has a recessed
frame, trim the template so it fits inside the recessed area. Align the
centerline of the upper cabinet template with the centerline of the
wall template, then securely tape or tack the upper cabinet template
in place.
See Figure 22.
Figure 21[]
1
uppe[c_jnej 3_en2_glare o°
o2 "........°[
i....... : o
ooob_S6b_ooo
OOOOOOOOOOOOO
0 wall template O
m
Figure 22[3
- 41 -