


VARIETY STEAMER
14
P/N 1010745 Rev. G 03/06
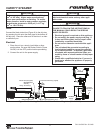
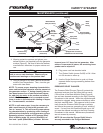
the steam generator hole. Take a suitable 1/16”
punching tool (such as a paperclip) and fully
insert it through all 18 orifices in the black
manifold as well as through the 10 orifices in
the spray tube. This assures the orifices are
not obstructed with debris. Wash all items in hot,
soapy water. Rinse these items and allow them
to air dry.
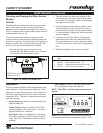
5. Reinstall the spray tube into the steam generator
hole and reinstall diffuser plate.
6. Lightly apply some Petrol Gel (included) onto the
large black O-ring and reinstall the O-ring onto
the manifold plate (this allows the manifold plate
to seat easily onto the steam generator). Hold
the manifold plate up to a light source and verify
that light is visible through all the orifices. If so,
seat the manifold fully onto the generator and pull
the locking lever forward to lock the plate.
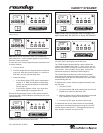
7. Check that the water pressure regulator is cor
-
rectly set to 20 PSI (1.4 Kg/cm2 or 138 kPa).
8. Reinstall all parts and accessories.
Monthly: Cleaning the Steam Generator
Your steamer utilizes an open steam generator. Water
sprayed onto the generator surface flashes into steam
immediately, but the minerals in the water do not
steam, they stay on the generator surface. A small
amount of calcium/mineral deposits are needed for
proper operation, but a build-up of excessive calcium/
mineral deposits causes poor steaming efficiency,
excessive moisture (wet steam) and will eventually
affect the steaming action completely.
1. Turn the Rocker Switch (power On/Off) to OFF.
Unplug the power cord and allow the unit to cool
down before proceeding.
2. Perform the Daily Cleaning procedures, but
DO
NOT
reassemble the unit.
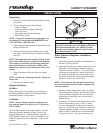
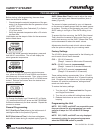
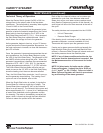
3. With the unit cool, use a NON ABRASIVE
brass
brush and/or scraper to loosen and remove the
excessive calcium/mineral deposits from the gen-
erator surface (Figure 8). Wipe the generator
with a clean damp cloth. Reassemble the unit.
NOTE: If deposits are still excessive and/or diffi
-
cult to remove, see Step 4.
MAINTENANCE
WARNING
Turn the unit off, disconnect the power source,
and allow the unit to cool down before performing
any service or maintenance on the unit.
Daily Cleaning
NOTE: Frequency of cleaning is determined by
water conditions, usage and water filter systems.
1. Turn the unit off and unplug the power cord.
Allow the unit to cool for approximately 30 min
-
utes.
2. Check the rear water quick disconnect fitting and
all hose clamp connections for leakage. If leak
-
age is apparent, tighten all clamps or replace
part(s) if required.
3. Remove baskets, top cover housing assembly,
drip tray, and wash in hot, soapy water. Then,
rinse these parts and allow them to air dry.
4. Remove the Black Manifold plate by slightly lifting
and sliding the Locking lever (on the right side
of the unit) towards the rear, carefully remove
the plate and remove the large black O-ring from
the plate. Remove the diffuser plate and then
remove the spray tube by carefully lifting the
loose end and gently twisting and pulling it out of
CAUTION
Do not use a sanitizing solution or abrasive mate-
rials. The use of these may cause damage to the
stainless steel finish.
CAUTION
If a chemical cleaner is used, be sure it is safe to
use on cast aluminum. Observe all precautions
and warnings on product label.
CAUTION
Unplug power cord before moving and servicing
this appliance.
CAUTION
Failure to regularly and/or properly clean this
equipment may damage it or cause the user bodi-
ly injury.
WARNING
Refer to the instructions for cleaning and handling
the unit within the Important Safety Information
section of this manual.