7
VARIETY STEAMER
P/N 1010745 Rev. G 03/06
Unpacking
1. Remove unit and all packing materials from ship-
ping carton.
2. The unit should contain the following:
• Owner’s Manual
• Authorized Service Agency Directory
• Petro Gel Tube
• Inlet Hose and Strainer Assembly
• Black Drain Tubing
NOTE: If any parts are missing or damaged, con
-
tact Antunes Technical Service IMMEDIATELY at
1-877-392-7854 or 630-784-1000.
3. Remove all packing materials and protective cov
-
erings from the unit.
4. Remove and wash all removable parts in soap
and water. Rinse with clean hot water and allow
to air dry.
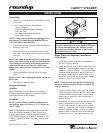
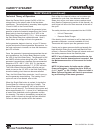
NOTE: The steam generator surface (Figure 8) will
have a thin white coating of artificial lime deposits.
This coating is necessary for steaming character
-
istics and should not be removed. Refer to the
Maintenance section of this manual for more infor
-
mation.
5. Wipe all surfaces of the unit with a hot damp
cloth.
NOTE: Do not use a dripping wet cloth. Wring out
before use.
6. Re-install all removed parts.
Equipment Setup
GENERAL
When placing the unit into service, pay attention to
the safety guidelines listed in the Important Safety
Information section of this manual.
PLUMBING
NOTE: Variety Steamer models are designed to
use cold tap water at 20-25 psi (1.4-1.7 kg/cm
2
or
138-172 kPa).
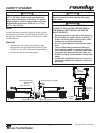
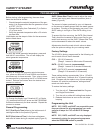
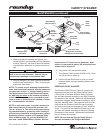
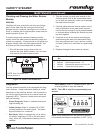
Your VS-350 requires direct water hookup. An Inlet
Hose and Strainer assembly (Figure 2 and 2A) is
supplied with the unit. A water pressure regulator
(P/N 7000235 (Figure 2A) to feed 2 steamers or P/N
7000314 (Figure 2) to feed 1 steamer), must first be
installed.
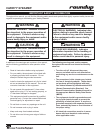
INSTALLATION
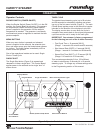
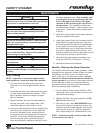
Figure 1. Variety Steamer
Water Pressure Regulator Installation
Instructions
1. Install the regulator assembly to the steamer as
shown in Figure 2 and 2A.
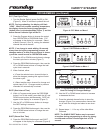
2. Open the shut off valve to allow water flow to the
Regulator. Ensure that the steamer pressure
regulator is set at 20-25 psi. If not, confirm that
incoming water pressure is above 25 psi and, if
so, adjust the regulator by pulling softly on the
knob and turning until the gauge reads desired
pressure. Push in the knob to lock.
NOTE: If the pressure was adjusted, the existing
pressure must be relieved in order to register the
new set pressure
3. Push the “white” plastic tip on each 1/4” elbow
Quick Disconnect (Figure 2 and 2A) and hold for
a few seconds to purge out air in the line and
allow water to flow freely into a bucket with a
steady stream.
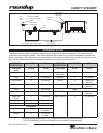
4. Push each 1/4” elbow Quick Disconnect into the
rear of the steamer(s) until a “click” is heard.
Turn on the steamers and allow 20 minutes to
warm up. Cycle the units 3 times and check the
pressure regulator setting. If there is a change,
adjust it again to read 20-25 psi and then push
the knob in to lock. The unit is ready for use.
CAUTION
This equipment is to be installed to comply with
the basic plumbing code of the Building Officials
and Code Administrators, Inc. (BOCA) and the
Food Service Sanitation Manual of the Food and
Drug Administration (FDA).