15
VARIETY STEAMER
P/N 1010745 Rev. G 03/06
4. Wearing protective eyewear and gloves, pour
delimer solution (not supplied) onto the generator
surface (Figure 8). Be sure to follow the delimer
manufacturer’s directions for proper mixture and
use.
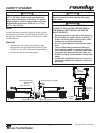
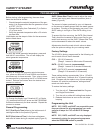
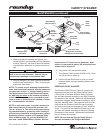
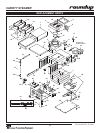
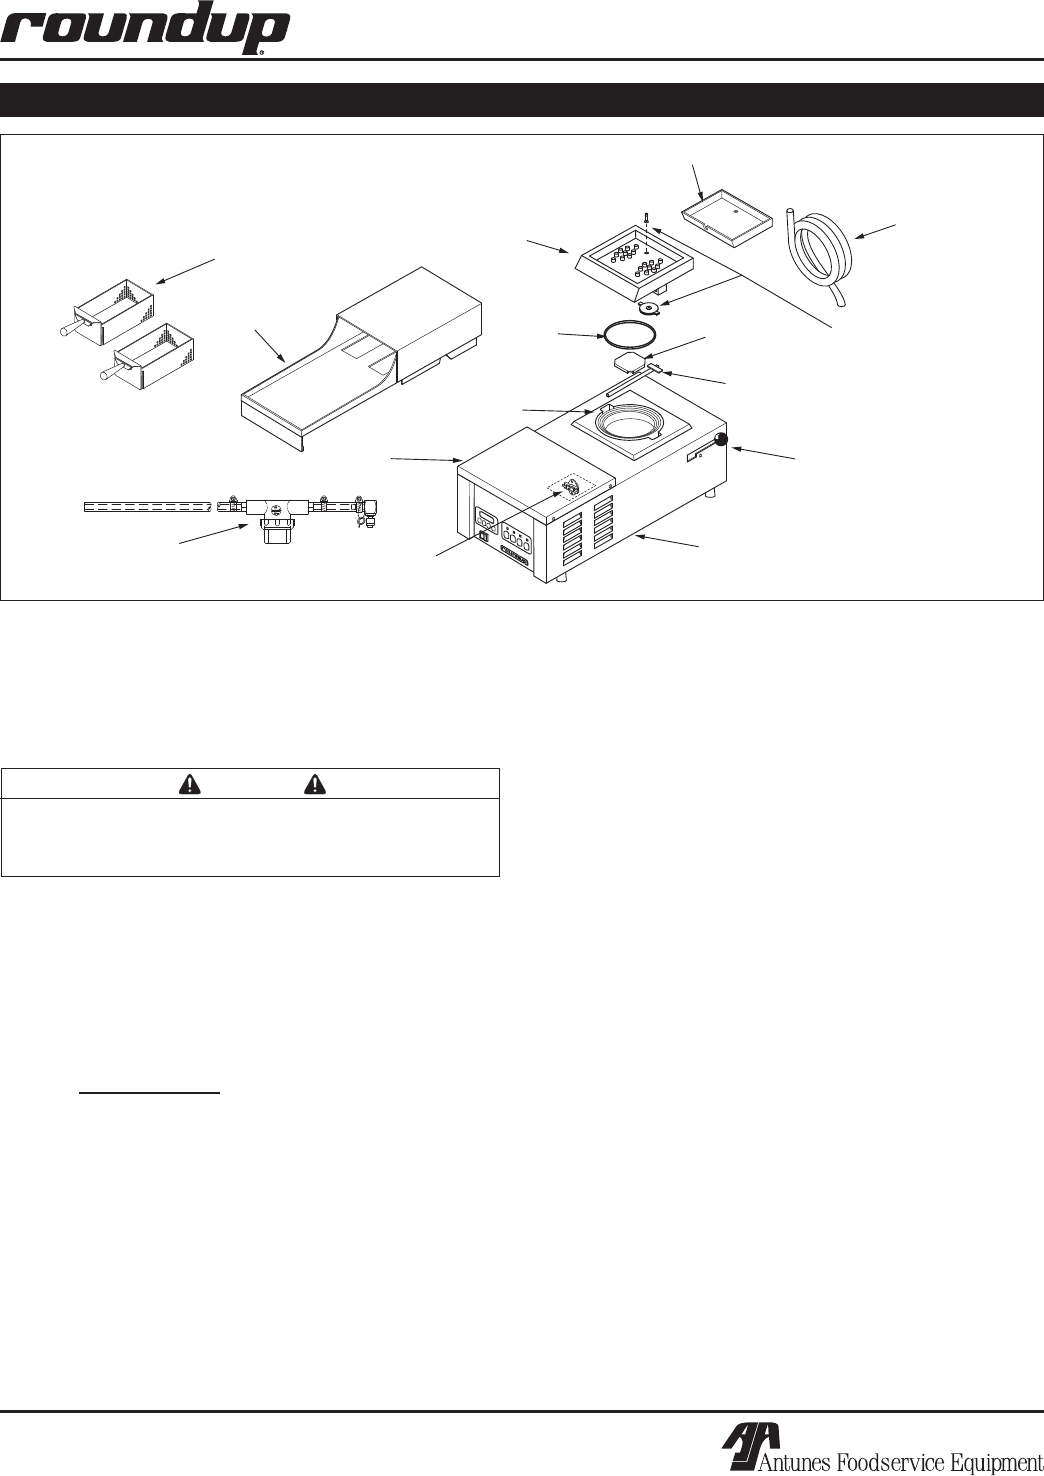
Figure 8. Variety Steamer Components & Accessories
O-ring
(must be
lubricated
daily)
Diffuser
Spray Tube
(w/ orifices)
Black Manifold
Plate (w/ orifices)
DripTray
Lock
Lever
Top Cover assy.
Double
Baskets
Steam
Generator
Black
Drain
Tubing
Inlet HoseAssy.
(w/ Strainer)
Hi-Limit Thermostat
(inside unit)
Electrical
Housing
Cover
Older units came
equipped with an external
resettable Hi-LimitThermostat
Pressure Relief
Plunger (assembly)
5. Using a sponge or dry towel, remove the delimer
solution from the generator. Then, rinse the gen
-
erator with clear water.
NOTE: To ensure proper steaming characteristics,
some calcium/mineral deposits must be present on
the generator surface. If, during cleaning, the sur-
face does become free of calcium/mineral depos-
its, add plain tap water to the surface and allow it
to boil off. This may have to be repeated several
times in order to formulate a thin coating of depos-
its. If unsuccessful, see below.
NOTE: In soft water areas, it may be necessary to
add a small amount of lime to the generator sur-
face to “season” it. This will ensure proper steam
-
ing characteristics by producing a thin coating of
calcium/mineral deposits on the generator surface.
Seasoning mixture consists of 3/4 ounces (25ml/
25cc) of baking soda, 3/4 ounces (25ml/25cc) of
lime and 1 quart (950ml/950cc) of water. Stir mix
-
CAUTION
If a chemical cleaner/delimer is used, be sure it is
safe to use on cast aluminum. Observe all pre-
cautions and warnings on the product label.
ture and pour 1/4” deep into hot generator. After
mixture is converted to steam, the remaining loose
powder can be wiped off.
6. Plug power cord into electrical outlet
7. Turn Rocker Switch (power On/Off) to ON. Allow
unit 30 minutes to warm up.
8. Use the Single Shot button to cycle unit three
separate times to purge remaining delimer from
generator.
PRESSURE RELIEF PLUNGER
The Pressure Relief Plunger (Figure 8) protects the
equipment and user from any harm that can result
if the orifices of the Black Manifold Plate (Figure 8)
has not been cleaned according to the Daily Cleaning
Procedures in this manual. When the orifices become
restricted or clogged, steam pressure buiilds up within
the black manifold plate. This pressure build-up even
-
tually forces the Pressure Relief Plunger to elevate
and relieve the pressure, generating a loud “whistling”
sound. If at any time this condition should occur, the
unit must be cleaned according to the Daily Cleaning
Proceduers in this manual. Maintenance procedures
are not covered by warranty.
NOTE: Be sure that the Plunger Relief Valve is
securely mounted to the Plunger Weldment.
MAINTENANCE (continued)